The Content Delivery Network, aka CDN, is the cluster network that serves the static files from the closest data center to the end user. WordPress has its CDN network known as Photon CDN which syncs and serves the images from the WordPress blog.
However, officially WordPress Photon CDN needs a Jetpack Plugin to support free CDN. But, most WordPress bloggers and developers do not prefer installing Jetpack as it’s too heavy. Hence, many WordPress users miss the chance to use this free CDN service.
ALERT: It is not recommended to misuse the Photon CDN. If you’re a business owner or host multiple websites, use the Jetpack module or switch to any other paid service. I’ve personally switched to Cloudflare CDN and it works great.
In this article, we will learn how to set up the CDN Enabler plugin to use the WordPress Photon CDN address for serving the images via free CDN without installing the Jetpack module.
If you’re following us, this is the seventh article and video demo in the #WordPresssBlog series. We previously posted about the WP-Optimize setup for Database and Image Optimization.
Let’s dive into setting up the free WordPress Photon CDN for media images without the Jetpack plugin —
What is WordPress Photon CDN?
WordPress Photon CDN is the free image content delivery network that serves the locally uploaded images from the nearest data center server spread across the globe.
Suppose my server is hosted at the New York data center, and a blog reader is accessing the files from Sydney. This is long distance for static files to travel; hence the website load time will increase significantly.
But, when we use a CDN service like WordPress Photon CDN for images. The static image files are synced across all WordPress data centers. Now when the same reader access the files from Sydney, WordPress tries to access the static image from the nearest data center instead of our server location, i.e., New York.
Hence, improving the site load speed and thus the user experience.
Install CDN Enabler WordPress Plugin
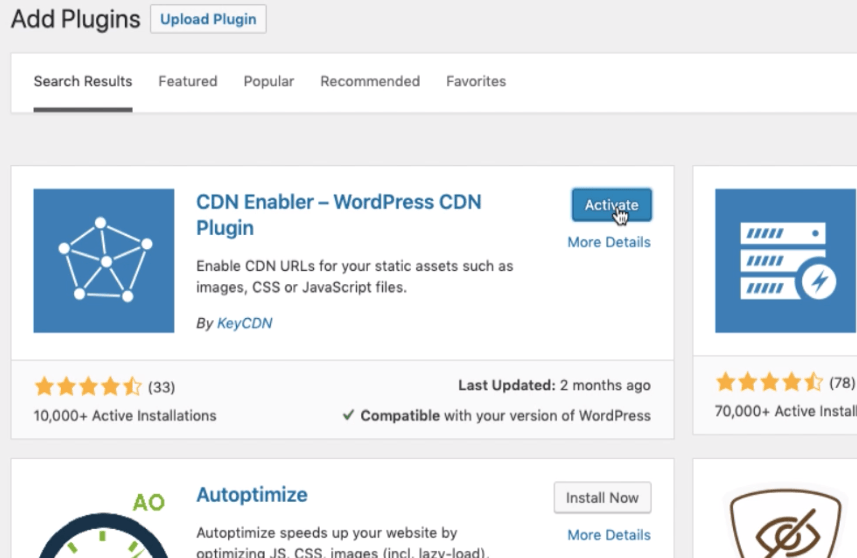
We are going to use this plugin called CDN Enabler by KeyCDN. This plugin helps to alter our website address and replace it with the WordPress photon’s address.
Follow the steps to install CDN Enabler on WordPress:
- Login to your WordPress Dashboard
- Navigate to Add New option under the Plugins menu
- Search and Install for CDN Enabler by KeyCDN
- Activate the plugin and head over to the CDN Enabler settings page
Setup CDN Enabler plugin for Photon CDN
The Photon CDN has 4 different CDN address that helps to serve the images from WordPress CDN. The Photon CDN addresses are:
- i0.wp.com
- i1.wp.com
- i2.wp.com
- i3.wp.com
These addresses are dynamically changed when we use the Jetpack-enabled Photon CDN. However, we will use either address in our case since CDN Enabler has only one field.
Let’s use the first address i.e. i0.wp.com for our demo site. Setup the CDN Enabler with the details below and ensure you’ve correctly entered your image library location.
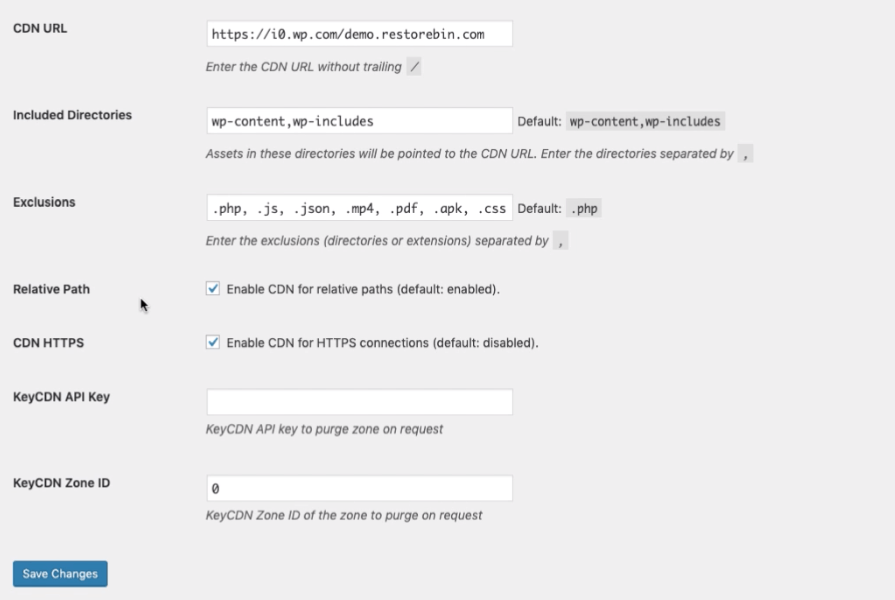
- CDN URL: Enter the CDN address and your domain name to serve the images. The CDN URL for my demo.restorebin.com will be: https://i0.wp.com/demo.restorebin.com
- Included Directories: These are the default image library directory in our WordPress installation. You can leave it to default whatever this is displayed in the field. You may also add multiple local directories by separating them with ,
- Exclusions: List of file types that need to excluded from the CDN Enabler to apply the CDN URL. Make sure that you’ve excluded all the file types except image filetype. I personally exclude the following types: .php, .js, .json, .mp4, .pdf, .apk, .css
- Relative Path: Keep this option enabled
- CDN HTTPS: Enable this option to serve the images from HTTPS instead of HTTP. Since we have already set up the Let’s Encrypt SSL certificate, it’s essential from a security standpoint that we are serving the images from HTTPS
- KeyCDN API Key and KeyCDN Zone ID shout be blank
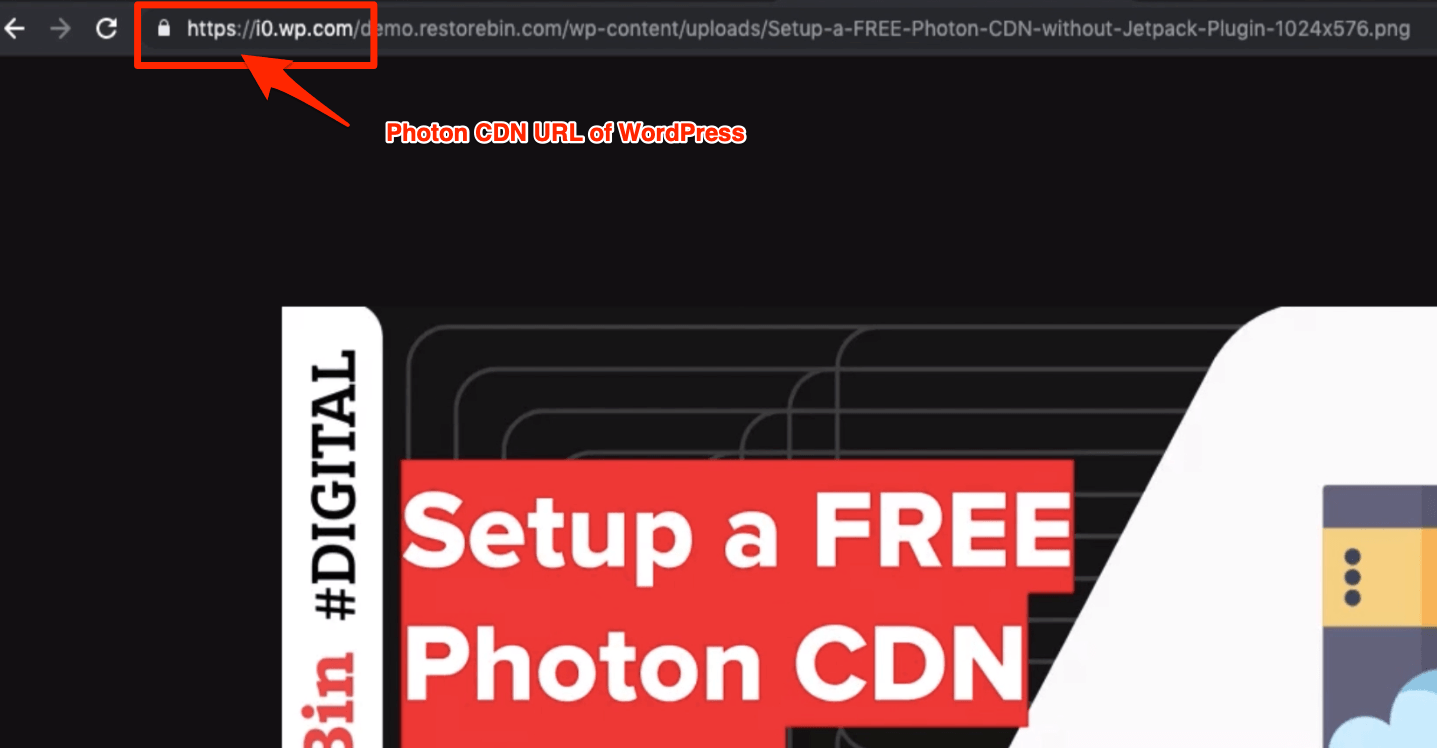
Upload and Test Free Image CDN
Now let’s upload an image into our media library to see if the images are served from the Photon CDN address; since we have set up to use the i0.wp.com CDN address for all the images, it should serve our uploaded image from the same address.
https://i0.wp.com/demo.restorebin.com
Video on Photon CDN without Jetpack
Watch the video tutorial on setting up the WordPress Photon CDN for serving the images from wp.com without using the Jetpack plugin.
I hope you liked the video; please subscribe to our channel.
What’s Next in the #WordPressBlog Series?
Now that we have set up the free CDN for WordPress images using CDN Enabler, we will check in on setting up the free CDN for our CSS styles and JS script files.

This guide is very interesting. But, does this CDN plugin not make my site slow? then is there another guide without using the help of a plugin?
Thank you, Mas.
Of course, we can use the rewrite rules in our webserver (Nginx, Apache, etc.) and modify the URL to load from wp.com CDN. But, it may sometimes break the uploading. In that case, we need to carefully write the rules that support uploading into our host but retrieving with prepended wp.com CDN URLs.
One thing that I like about the plugin, it just rewrites the URL on fly. If tomorrow you deactivate the plugin, within no time your images will be served from your host instead of CDN.
However, feel free to experiment and let me know how it goes without a plugin. 🙂
Is safe use this method? can i get banned? and if i get banned this only excludes me from jetpack services or there is any other service affected
I don’t think there is a way to track down the user of this service. Anyways, this is a free service offered by WP.com, hence I don’t think there will any issue.
In the worst case, a website can be blacklisted. But, chances are negligible.
Hi,
Thank you for the great information above.
I have a quick question, I’m using short pixel AI and the images are served from their CDN ….but I want to use the CDN you have shown above I have set it up as the steps you have shown.
But now I would like to change the settings in Shortpixel AI to the new CDN …..do I just copy and paste the new URL path as above or do I still need to do a cname record?
here is a screenshot od short pixel AI advance settings to change to new CDN
[link removed]
p.s appreciate any help or info you can give, please
Kind regards
Adie
Hi Adie, I haven’t used Shortpixel, not sure if this works! However, you can try using the i0.wp.com/yourwebsite.com/img/folder/ as CDN to check whether it works or not.
And make sure to select the option to BOTH instead of SRC or SRCSET. This will help in rewriting all the image URLs on site.
As far as CNAME, I don’t think you need any CNAME record. Simply changing the CDN URL will do.
Let me know how it goes.
Hello – this is amazing… just one issue – many of the store icons are replaced with a small square… such as the scroll to top, the empty cart icon, the plus and minus buttons in the cart…
It’s possible that you’re using the FA-Icons on your website. It’s not the issue related to this setup. Check for any browser console errors while loading your site.
This is awesome! You just solved my major issue… thanks a lot 🙂
Hi, with the latest update from cdn enabler i got an error message writing down on cdn url box. Is there any changes i need to do to serve images from wordpress cdn?
I’ve stopped using CDN Enabler with photon CDN. Instead moved to Cloudflare CDN which works great for images and other static assets.
this is not working anymore!
Not working any more.
Brother needed WP.me Shortlinks without jetpack 🐶