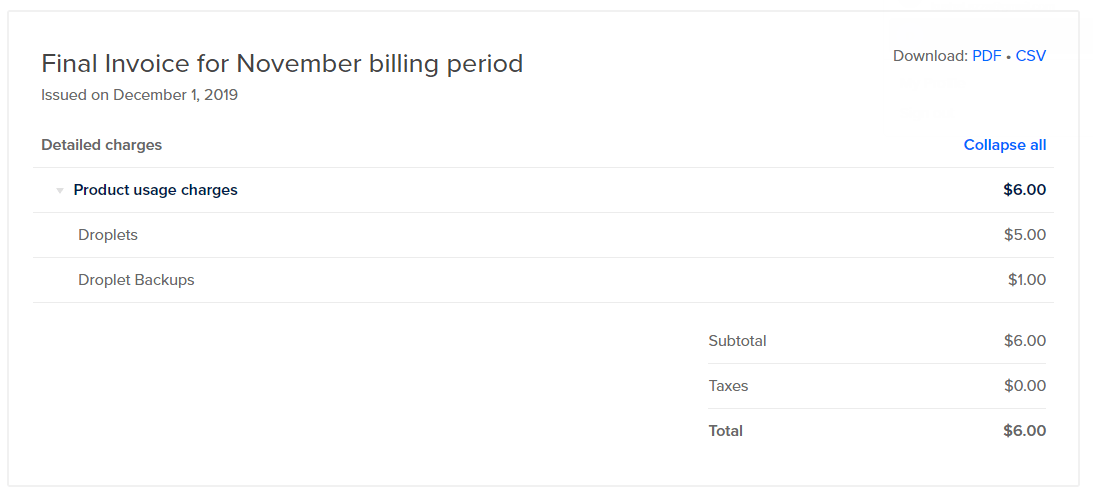
It’s been a while since I haven’t published anything interesting. Okay, it’s 0440 hours in local time. I woke up too early today and am writing this post on how I manage a server running a blog that garners 6+ million page views every month at only a nominal cost of $6 ($5 server + 1$ backup).
You read it right; it is just a $5/month starter cloud server from the DigitalOcean(DO).
I’ve been managing the DO cloud server since 201
You can follow this post if you don’t know about DigitalOcean and how happy I have been.
Many things come into play when managing a server; unlike managed cloud hosting, you have to deal with every single issue on your own.
I had many sleepless nights and unlimited make-and-break command-line trials that finally helped create a server that could bear extensive peak load.
Before getting started, here is a sneak peek of DO billing —
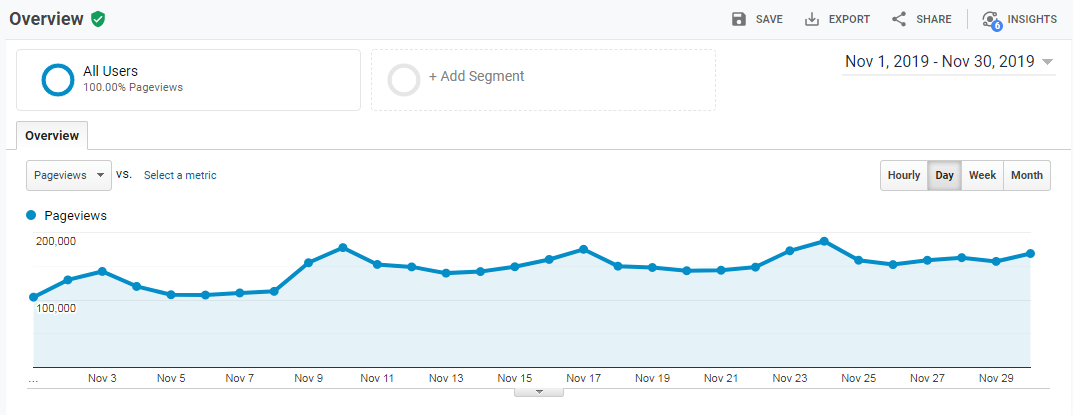
and Google Analytics performance graph of DigitBin.com for Nov 2019.
Without further ado, let’s get started —
Note: The post has been updated to support the latest PHP version, however, the screenshot/images still reflect the older version.
Backend Server Configuration
When I say ‘Server’, it’s entirely the backend invisible part that host’s the site. Here are the configuration and specs of the cloud server running behind DigitBin:
Hardware Specs
It’s configured on the same basic standard droplet in DigitalOcean, which is available at $5 per month.
- CPU: virtual shared single-core (1 vCPU)
- Memory: 1 GB RAM
- Disk Space: 25 GB SSD
- Bandwidth: 1 TB transfer
- Location: NYC
I have also enabled the weekly droplet backup that additionally costs 20% of droplet cost, which is $1 for retaining four backups.
Software Specs
After multiple rounds of performance tweaks, I’ve now settled down to the below LEMP Stack configuration:
- Operating System: Ubuntu 22.04 Server
- Web server: Nginx
- PHP version: 7.4
- SQL: MySQL 8.0
- Mail server: Postfix
- Firewall: UFW
I initially created the server with the Apache2 web server (LAMP); however, we moved to Nginx (LEMP) a few years later.
Now I am not going into detail about how I configured the software and hardware specs cause I already have a series of posts and video demos you can refer to.
If you follow the guide carefully, I believe you will have the best and most secure server configuration to date.
Backend Performance Configuration
While basic server setup is essential in hosting and running the website, its performance tweaks enhance the server’s capability.
I have tweaked every bit of the server configuration to make it robust and sustainable at peak loads. For example;
Nginx Setup
I consider the Nginx the fastest compared to the Apache webserver. It’s lightweight and has a heavy processing capability.
To further improve its capabilities, I’ve added the snippets to execute browser caching headers, gzip compression, added security snippets, http2, and more. This will eliminate the reliance on third-party extensions in the front end.
PHP Setup
PHP7.4 is the fastest PHP version compared to its predecessors. I have enabled the capability of FPM (FastCGI Process Manager) for processing requests during heavy loads.

This is also used for generating and serving the static html page from dynamic content using FastCGI nginx cache.
MySQL Setup
I use MySQL8.0, considered the fastest among predecessors (MySQL5.7), and likely has the capability of MariaDB.
It also uses the Redis Object Caching that helps cache the complex and most requested queries within the RAM, improving the processing speed and reducing the dependency on MySQL to process every request.
The cloud server setup guide covers many things that help optimize the overall server performance.
WordPress CMS Tweaks
DigitBin.com is running on the WordPress blogging CMS with the rich capability and features to fully control, manage, and improve performance. Though I mostly rely on backend optimization, a few minor tweaks still need to be made in the front end.
WordPress is a lightweight CMS that consumes little memory and CPU for operation. But, things get clumsy when loaded with heavy memory-intensive plugins.
Especially the caching and security plugins like W3 total cache, WP Supercache, Wordfence, etc., are pretty heavy on the server. Hence, I always look up alternatives it can implement in the backend. That’s where the FastCGI cache, nginx browser cache, redis object cache, UFW firewall, etc., is a perfect substitute for the features these plugins offer.
Always choose the plugins wisely. I add plugins if and only if there is no alternative or can’t be managed at the backend, like SEO plugins.
Offloading Static Assets
Few static assets often help to load and visualize the site, like JS, CSS, Images, and HTML. Though HTML is an integral part of the front-end, which cannot be offloaded completely; however can be cached and distributed from the nearest edge caching server (more covered in the Cloudflare CDN section below).
Free Images Offloading:
I am very thankful to WordPress for its generous support that helped offload the images using photon CDN for free (clubbed into JetPack as Site Accelerator). You can read it here if you do not know about photon and its API.
With the Photon CDN, I can save a few TBs of bandwidth against the images. Every image hosted on DigitBin is automatically synced and replaced with a photon CDN URL. Hence, saving the bandwidth cost and serving the image files from the photon’s edge caching server.
Besides saving bandwidth, CDN also converts the image into webp format, which is considered the superior lossless and lossy compression for images on the web.
Eventually, I am planning to migrate the images to Cloudflare CDN under sub-domains.
Offload CSS and JS:
CSS and JS are essential assets that make front-end design attractive and interactive. I have (had) offloaded using plugins named commonWP and NGT jsDelivr. One can use either of the plugins to check which is compatible and working with your installation. However, I have used both interchangeably.
Both plugins will rewrite the site’s static CSS and JS asset URLs to free open source CDN like JSDelivr. Example: https://wpaq.com/staticfiles.js will become https://cdn.jsdelivr.net/staticfiles.js. It further reduces the bandwidth usage as well as server load.
However, there are certain conditions for rewriting the URLs. Like:
- The active theme and plugins must be from the WordPress repository.
- The developer should commit the files within /tags/ sub-directory folder (not in our control).
You can refer to the individual plugins details page for more such limitations.
[Note: I recently stopped using the jsdelivr since I wanted to combine JS & CSS assets and serve as a single file. Additional details are in the Cloudflare section]
Optimize Assets
Asset optimization is another important part that helps in improving server performance as well as improving this site loading speed.
Image Optimization:
As mentioned above, the Photon CDN automatically converts the image and compresses it into webp format; hence further optimization is not necessarily required. However, if you think you can improve loading time further, you can compress the image file using smush.it API.
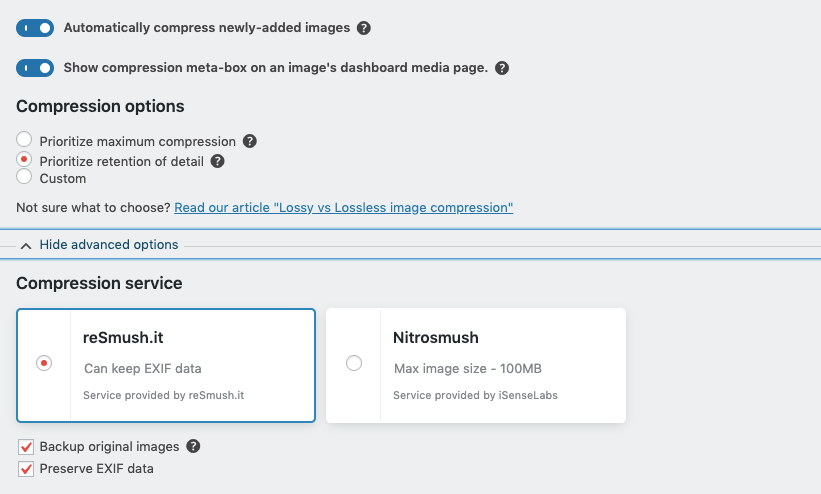
There is a dedicated plugin for smush.it, however, I use WP-Optimize plugins that not only incorporate the smush.it also helps in the database cleanup.
CSS, JS and HTML Optimization:
WP-Optimize also has the feature to minify, cache, compress, and preload HTML, JS, and CSS. However, if you alter or make any changes to JS and CSS files, then free asset offloading using jsdelivr won’t work.
Regarding HTML caching, we already have the Nginx FastCGI caching that works without any additional caching plugin.
I recently started using the Autoptimize plugins for minification and combining assets. Though this has increased the server load a bit since it requires memory for processing, it’s worth it.
Cloudflare CDN Settings
So finally, here is the section I mentioned twice above.
I used Cloudflare CDN a couple of years ago (I do not remember exactly but maybe in 2015), but my experience wasn’t great in those days. The site performance dropped, and it also the loading became slow. Hence, immediately switch back to the original server and stay.
But recently, I heard pretty good reviews regarding improved site speed and fast DNS resolving capability. Hence, I thought of giving it a try again.
I switched from Google DNS to Cloudflare DNS, made it mandatory to set up, and started serving the files from Cloudflare Edge CDN caching.
I currently use the page rules, service workers, Cloudflare DNS for speed, SSL certificate, and minimal WAF security.
Cloudflare Page Rules
The Page Rules in Cloudflare is a helpful feature that helps set up the site performance. It also accepts the wildcard parameter *, making it more robust.
I currently have these two rules which cache everything within the /content/ or /wp-content/ and /wp-includes/ directory and store in edge cache for 7 days.
The files minified and combined using the Autoptimze plugin are automatically served using the below page rules. Hence, there won’t be any additional bandwidth consumption from the cloud server.
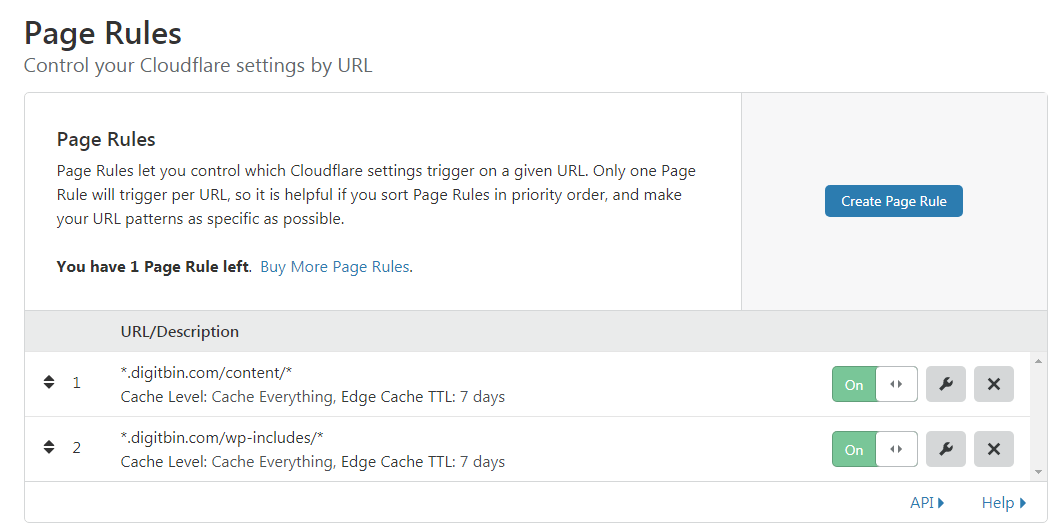
Edge caching helps store and sync the cached static files in the nearest edge server. When a user requests the webserver files, the Edge cache serves from the closest CDN pop datacenter—making the site a faster and smoother loading experience.
Cloudflare Service Worker
The Service worker was relatively new when I started using Cloudflare again. The service worker helps deploy the JavasSript worker on the Edge server that can control the website HTTP request.
I use a service worker to Cache Everything on the front-end part. This script helps bust the cache when logged in as a WordPress user.
The cache will help edge cache the dynamic HTML in the Cloudflare server. So when the subsequent web request is sent, Cloudflare automatically serves the HTML copy of the web page from the nearest CDN Edge server datacenter instead of hitting our original DigitalOcean cloud server.
Due to the Edge caching mechanism, this significantly reduces the server load and makes the web serving extremely faster.

The service worker is chargeable. You won’t be charged a penny if you’re within the free tier limit.
Security Settings
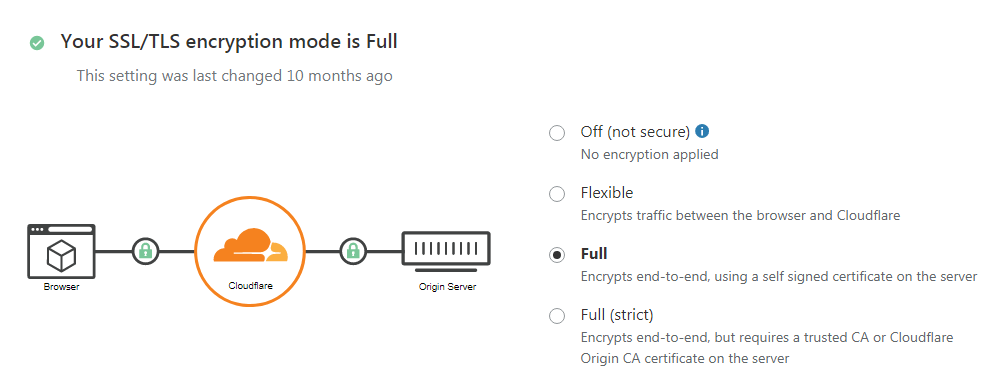
You can skip this item using the Let’s Encrypt free SSL certificate service. However, I moved to Cloudflare SSL and discounted the Let’s Encrypt. Cloudflare provides excellent options and controls to improve site security.
Cloudflare also has a bot protection mode known as Web Application Firewall (WAF), which you can customize to any security level. I keep the Low mode since I have multiple crawler bots on the site.
Note: Do not use Cloudflare and Let’s Encrypt together. You may encounter the redirect loop error. Also, remove all the Let’s Encrypt rules you might have added to the Nginx configuration file.
Bandwidth Served from Server
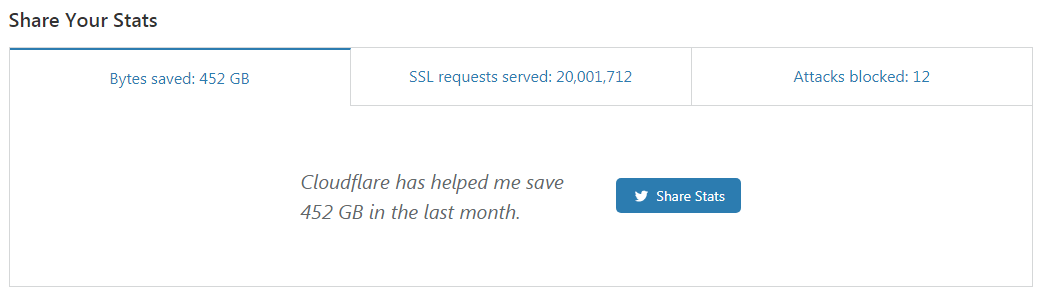
Since most of the static and dynamic assets are served using the Cloudflare and Photon CDN. The total bandwidth usage on the DO droplet is unsurprisingly low. Here are the stats of the DigitalOcean and Cloudflare servers for last month:
Cloudflare:
Last month the Cloudflare CDN helped me save 452 GB of bandwidth by serving all static assets (except Images) and cached HTML pages.
Photon CDN:
The Photon CDN helps to save unlimited image bandwidth. I do not have an exact counter; however, I guess the bandwidth will be near ~20TB. DigitBin is an image-heavy site with the average size of an image being 100KB.
Photon CDN helps save bandwidth and reduces server requests. They are making CPU and RAM available for other critical task-intensive processes.
Eventually, I am planning to move. I’ve moved the images into Cloudflare CDN, making the site even faster.
DigitalOcean:
After cutting off the bandwidth to Cloudflare and Photon CDN, the DigitalOcean has only received limited bandwidth transfer requests — 22 GB per month.
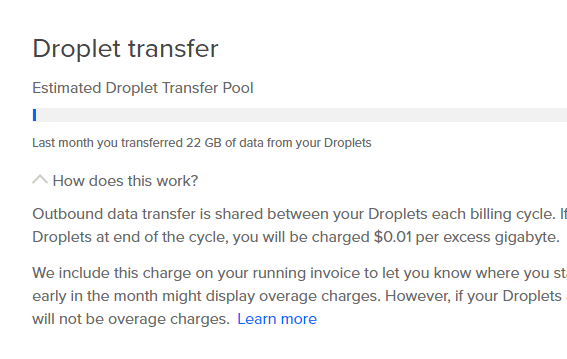
The data transfer size has increased on the DO droplet after installing the Autoptimize plugins and disabling the JSDelivr CDN plugins. Earlier it was less than 10GB (~8GB) per month.
Bottom Line: DigitBin Performance
So this was all about the server and website configuration of DigitBin that I currently manage at a nominal cost.
Though I have been charged additionally for Cloudflare service workers after crossing its graceful free limit, that isn’t very important. We can stop these charges if you do not use the service workers.
Overall I am pretty happy with the DigitalOcean server performance and free Cloudflare CDN and security setup.
I know you might have additional questions in your mind; feel free to drop them in the comments below. Also, please drop any thoughts about my configuration or suggestions.
Hi
I am also using DO with $5 droplet but I keep getting RAM issue. I have to restart mysql servers when I’m doing some backend work on website using putty ssh cmd : sudo systemctl start mysql
I have just NO TRAFFIC right now. Still RAM issues. I used their WP Automatic Install to create Droplet instance.
Please shed some light if you can on this issue.
What is your Web Server? and Which is your MySQL server version?
I installed it through the automatic wordpress installer in DigitalOcean. It is using Ubuntu. Not sure about the MySQL version but it must be latest as I installed it just a few months ago.
It’s stable MySQL 5.7, not the MySQL 8.0.
I have noticed you use cdn for this website, cdn.restorebin.com for loading some part of js and css.
may i know how you mapped cdn like this along with photon (which i too follow without jetpack) and jsdelvr.
Thankyou in advance!
Hi Sajeed, I use the BunnyCDN plugin to rewrite CSS & JS files from CDN.restoreBin.com and CDN Enabler for Photon Images.
PS: I have disabled Photon CDN for images, and using CDN Enabler for serving Image & JS/CSS CDN via Cloudflare service.
How are you using Cloudflare to cache your static content on a subdomain rather than the actual root path of the website.
I suupose you are using this workaround to save on Cloudflare worker resources as you’d not have to worry about caching logged in users with a subdomain in place.
But unable to understand the setup here. I followed our CDN Enabler article to use i0.wp.com as image cdn.
I think you have found a better way to serve static content post that as you’re using cdn.restorebin.com now.
Kindly share the updated method.
Regards
Hi Vinayak, I’ve moved every static content over to cdn.restorebin.com rather than using wp.com photon CDN. All I did:
1. Setting up the Sub-domain that is CNAME to root domain
2. Updated the CDN URL in CDN Enabler to cdn.restorebin.com
3. Added Page Rules in Cloudflare to “Cache Everything” any content matching cdn.restorebin.com/*
This setup helped me serving all static assets including the CSS, JS, and images from Cloudflare reducing the burden on my Original server.
Yes – I did use the CF Service Workers to cache everything (ignoring sign-in user) but eventually discontinued it. As I am using the Nginx FastCGI Cache.
So are you uploading all the static content (images, css, js) to cdn.restorebin.com?
Or is having a CNAME cdn.restorebin.com point to restorebin.com mean that cdn.restorebin.com/staticfile1.html will automatically point to restorebin.com/staticfile1.html and since the cdn.restorebin.com is using cache everything of CF, it will have CF cache it for the next time to serve through their edge servers?
Or also if not that then, Nginx FastCGI Cache is another droplet which has cdn.restorebin.com pointed to it which caches everything static on restorebin.com and is proxied through CF for further edge caching.
I am no longer using the CF “Cache Everything” for HTML caching. Earlier I had Edge cached but now discontinued. The CNAME cdn.restorebin.com is just for static assets (images, js, CSS) which is still set to Cache Everything under Page Rules.
— No, I am not uploading on cdn.restorebin.com, but got the original URL rewrite with the CDN Enabler plugin.
— Both, Nginx Cache and CDN are on same server within the same WordPress installation. I don’t want to complicate the process.
My Bad. Thanks for taking out time to reply.
I tried the process, as follows:
1. Create a CNAME cdn aliasing root domain.
2. In CDN Enabler added cdn.rootdomain.com
3. Added PageRule in CF for Cache Everything under cdn.rootdomain.com
But I’m probably missing something as it isn’t working actually.
Also, I have OpenLiteSpeed Server on Ubuntu 20.04 now. Have caching plugins enabled.
After adding the CDN Enabler, did the URLs for static assets have changed? Alternatively, you can use the BunnyCDN plugin. If nothing is working, then configure the wp-config.php to replace the content directory URL, you can find the steps in WP Official document.
I think you have removed my comment in moderation as I’m not seeing it as pending approval.
Anyway, thanks for previous articles.
Will have to find my answers on some other tech enthusiasts portal.
Sure, not a problem. Good luck! 🙂
What are DNS configuration for Cloudflare with DigitalOcean using cdn.example.com (subdomain) for caching.
First, you have to rewrite the static file URL to serve from a sub-domain like cdn.example.com. Next, you can create the page rule “Cache Everything” for the subdomain to serve from Cloudflare.
what should i rewrite here
server {
# Multiple hostnames separated by spaces. Replace these as well.
server_name star.yourdomain.com *.yourdomain.com; # Alternately: _
root /PATH/TO/WEBROOT;
index index.php index.html index.htm;
# static file 404’s aren’t logged and expires header is set to maximum age
location ~* \.(jpg|jpeg|gif|css|png|js|ico|html)$ {
access_log off;
expires max;
}
location ~ /\.ht {
deny all;
}
}
ps. got it from nginx to explain what Im asking
https://www.nginx.com/resources/wiki/start/topics/examples/server_blocks/
see wildcard subdomain, i’m following up your guide for months. Thank you, just little need then I’m good go all in.
You can follow this example configuration of nginx.conf file. The steps and example is very well explained in WordPress on Cloud post.
“rewrite the static file url to serve” you mean, Adding A records like name – cdn ip -server ip (in dns)
Hey Kushal, It’s amazing that you’re able to handle 6million visitors on a $5 droplet.
Can you please share a tutorial on how you have set up Cloudflare Service Worker as mentioned above?
Thanks.
Hi,
I really found your article useful but one problem i am not an IT guy and if you can help in layman terms for following matter:
I have just established a WordPress classified Ads website on ionos shared wordpress hosting. for improvement i have installed jetpack Image CDN that also now support css and JS i guess along with WP Super Cache. My hosting has 262,000 file limit plus 25000 monthly user limit. I dont know if my whole website (other than images) are on CDN or not as i am not an IT guy… I dont know i a worried like people will be accessing my shared server as only images are cdn i dot know what css or JS static means or include. Ifyou can guide whether with these settings all my site is cdn now and fast?
I am now looking for future plan. Please guide (as of present) what should the cheapest but fastest and secure option for image heavy sites (as everyone will be loading images) with respect to unlimited whole website CDN including images. i also dont want monthly visitor or number of files restriction? also easily manageable by me.
need your professional opinion and guidance. I am tired of reading article san articles and YouTube lectures and still wandering.
I would 100% recommend using a VPN server rather than a shared hosting server. You need to be a little technical for managing the server and site, but in long run, it’s totally worth it. If you are really thinking of scaling up the site and making a business out of it, switch to a good cloud VPS like DO, Vultr, etc. it will cost you very little for a starter plan compared to shared hosting else you can also consider Google Cloud free tier if you’re just setting up things.
Hey Kushal Sir, Need a little help please!
I’ve done few things for serving img|svg
via cdn.example.com using wordpress cdn enabler plugin
• Added CNAME on Cloudflare of cdn.example.com
• Saved url cdn.example.com in plugin
cdn.example.com is not directed to main server of example.com instead it’s showing
blank default page of webserver. Using cyberpanel for hosting multiple sites.
You need to update the WebServer (Apache, Nginx, or whatever your have) configuration file to point server name: cdn.example.com to WordPress Root folder.