WordPress is undoubtedly one of the best content management systems and blogging software. In this article, I will share a step-by-step guide on how to install WordPress with LEMP Stack on a cloud server.
I recently published a few articles on creating a LEMP stack and logging in to SSH and SFTP on Ubuntu Cloud Server. I’m using DigitalOcean Cloud server hosting. If you haven’t read those through the article, then recommend reading them to connect the dots.
I just wanted to share that this article and video demo is part of the #WordPressBlog Series. In this series of posts, I will check in on some of the best guides on configuration, security, optimization, and installing WordPress on Cloud Server.
Note: The post has been updated to support the latest PHP version, however, the screenshot/images still reflect the older version.
Let’s dive into learning WordPress Installation with LEMP —
What is WordPress?
WordPress is a free and open-source content management system based on PHP & MySQL. Features include a plugin architecture and a template system. It is most associated with blogging but supports other types of web content including more traditional mailing lists and forums, media galleries, and online stores.
— Wikipedia
It’s also said that WordPress is powering almost 65% of all the websites available on the internet today. WordPress also supports building the forums with bbPress, and e-commerce sites using Woocommerce.
As mentioned above, WordPress.org has a plugin and template architecture called themes, making it the #1 choice for developers and users.
WordPress also has a WP.com, which helps to create under its subdomain at no cost. However, the customization available on WP.com is quite limited and restricted.
Setup Registrar DNS to Point Domain toward Server IP
Each Ubuntu cloud server is assigned a dedicated IP address unique to each other. These addresses help locate the server and files when someone requests via the web browser.
It’s pretty difficult to remember this multi-digit numeric IP Address. Hence, the concept of domain name came into the picture.

An IP address can be assigned to multiple domain names; however, a single domain name can have a unique IP address. Whenever someone visits the domain via browser, it is resolved into an assigned IP address, and the files are retrieved from the webserver to a web browser.
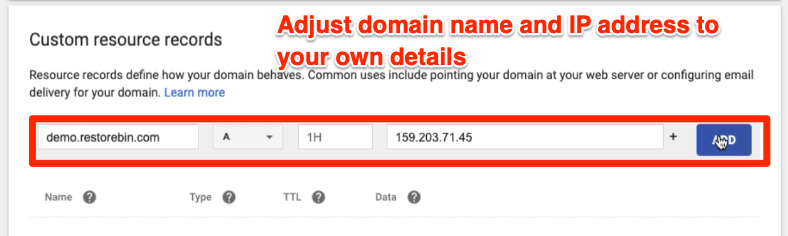
In our case, we already have an IP Address 159.203.71.45 allocated to our Ubuntu Cloud Server via DigitalOcean. We need to assign a domain name to this IP Address.
The domain name can be further split into multiple sub-domains and one root domain. Example:
- restorebin.com — is the root domain name whereas
- www.restorebin.com; demo.restorebin.com; XXX.restorebin.com are sub-domains
Each subdomain can be further associated with a unique IP Address. And I will be using demo.restorebin.com to associate with our cloud server IP Address.
The steps below will help assign your root domain name or sub-domain name to the IP address. If you’re planning to install WordPress completely, suggest going ahead with root domain association to IP.
If you do not have a domain name registered, purchase Google Domains or GoDaddy.
Follow the steps to assign the (Sub)Domain name to the IP address:
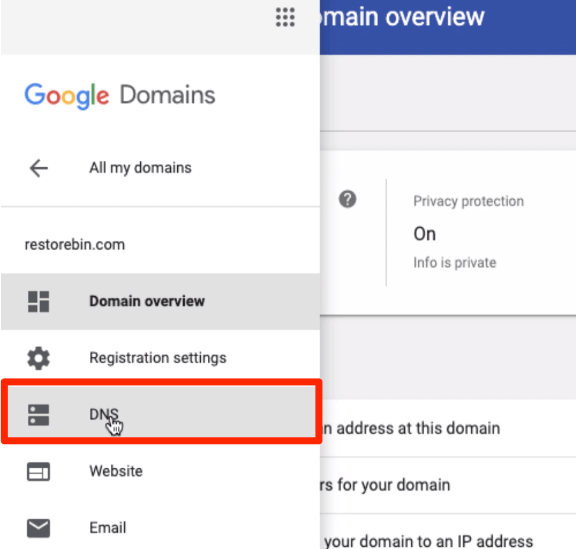
- Login in to your Domain registrar; say Google Domains
- Select the Domain name from the list
- Open DNS Settings

- Add an A record pointing to your IP Address with default TTL value
- If using root domain then add example.com point to IP Address
- If you’re using a sub-domain, then add subdomain.example.com point to server IP Address
- In my case, I’ll be adding the sub-domain demo.restorebin.com point to 159.203.71.45

- That’s it; your domain name is set up and associated with an IP Address now
The propagation of DNS settings might take anywhere from 5 minutes to 24 hours, and we do not have control. Meanwhile, you can progress with creating a MySQL Database for WordPress mentioned in the next section.
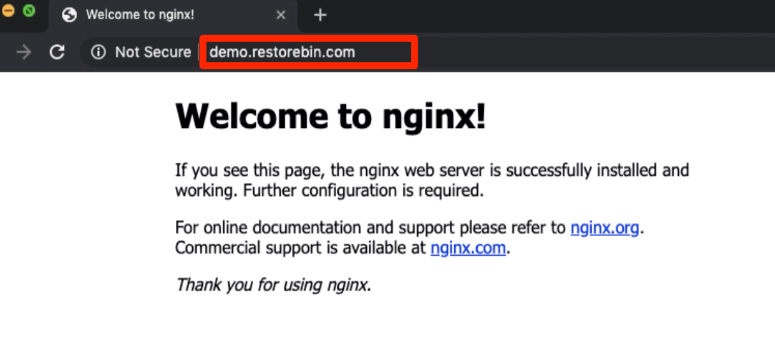
Once the DNS propagation is completed, visit your domain name in the browser to verify if the website is live.
You can also ping your domain name if it’s resolving your IP address.
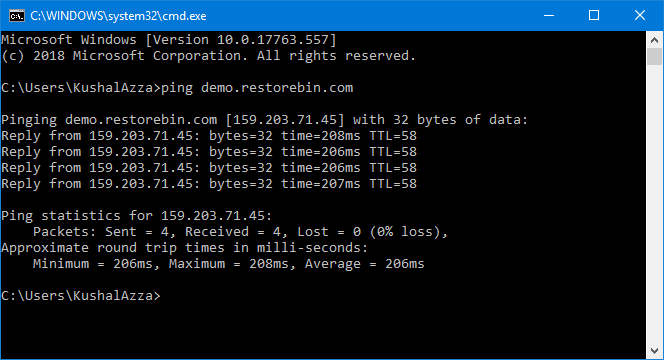
Type ping yourdomain.com in the macOS terminal or Windows OS CMD Prompt and check the IP Address.
I can see the Reply from IP Address is my Ubuntu Cloud Server IP Address. This confirms that my IP Address setup is completed.
Create MySQL Database and User for WordPress
Moving into MySQL Database —
WordPress needs a database server to store and retrieve posts and images published online. It also stores all the settings and meta information on a database server.
MySQL Server 8.0 is one of the fastest servers we will use for WordPress database management. You can learn how to install MySQL 8.0 on the LEMP Stack setup guide.
WordPress Configuration needs three pieces of information as a part of MySQL database setup.
- Database name: wpdatabase
- Database user: wpuser
- Database password: wppassword
We will be creating a new database and username along with the password for WordPress using these dummy values. Login cloud via an SSH client and run the following commands to generate the
MySQL DB for WordPress:
Login into MySQL from SSH using the root account:
mysql -u root -p
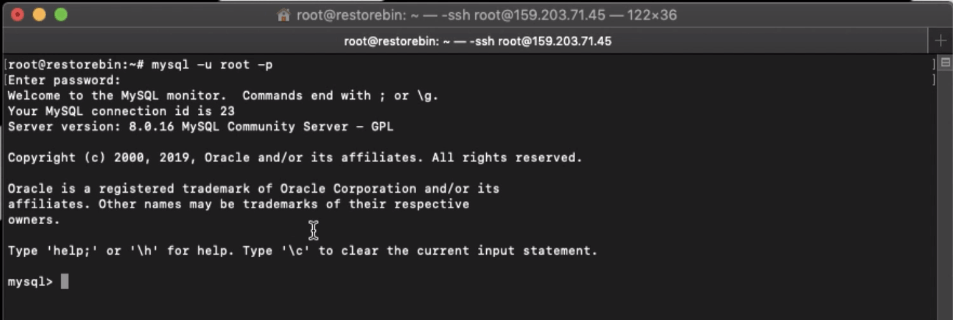
Enter the MySQL root account password when prompted.
Let’s create a database for WordPress. I’ll be using dummy values as mentioned above; however, you can modify them as you wish.
CREATE DATABASE wpdatabase;Next, we will create a MySQL user with a password and grant permissions to the database to operate and manage independently.
CREATE USER 'wpuser'@'localhost' IDENTIFIED BY 'wppassword';
GRANT ALL ON wpdatabase.* TO 'wpuser'@'localhost';
Now we have created a database and granted a user full permission. Commit the changes to the MySQL server and exit using the following command:
FLUSH PRIVILEGES;
exit;
This will flush all the privileges and commit the changes in MySQL.
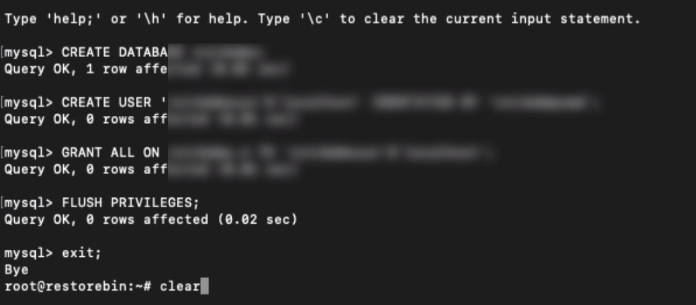
It will terminate the MySQL session, and you will be back into the Ubuntu shell.
Configuring Nginx for Domain and WordPress Setup
In the previous post, while setting up LEMP Stack we modified the Nginx Configuration default file located at /etc/nginx/sites-available/ to listen our IP Address and PHP Processor Socket.
This time we will adjust and add some additional value to the same configuration file.
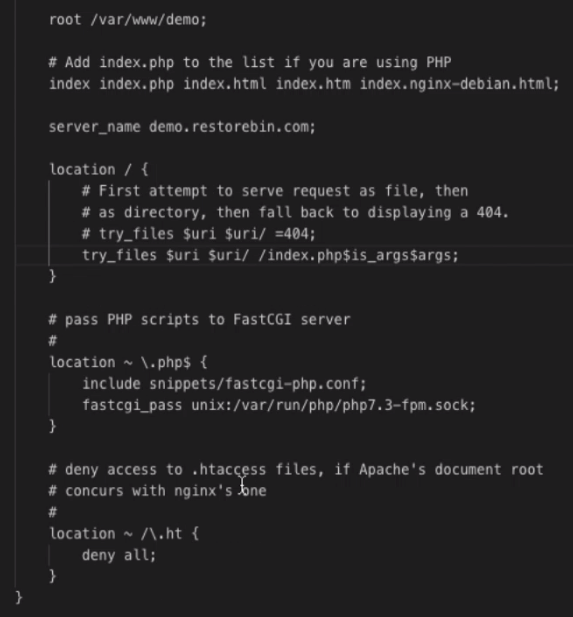
- We are going to change the server_name from IP Address to the domain name; in my case demo.restorebin.com
- Within the main server block, adjust the root to read the WordPress installation from /var/www/demo directory
- Inside the existing location / block, adjust the try_files to pass control to the index.php file in WordPress instead of default 404 errors by commenting on it
So the final setup of default Nginx Configuration files after ignoring the commented lines will look like this:
server {
    listen 80 default_server;
    listen [::]:80 default_server;
    root /var/www/demo;
    index index.php index.html index.htm index.nginx-debian.html;
    server_name demo.restorebin.com;
    location / {
        try_files $uri $uri/ /index.php$is_args$args;
    }
    location ~ \.php$ {
        include snippets/fastcgi-php.conf;
        fastcgi_pass unix:/run/php/php7.4-fpm.sock;
    }
    location ~ /\.ht {
        deny all;
    }
}
That’s it. Close the editor, and commit the changes to Cloud Server. Test the Nginx using the below command:
nginx -t
If the test configuration goes well, then finally restart nginx:
sudo service nginx restart
You’ve now completed the Nginx setup to listen to the WordPress installation directory and will be using WP for any 404 errors.
Download and Configure WordPress Files
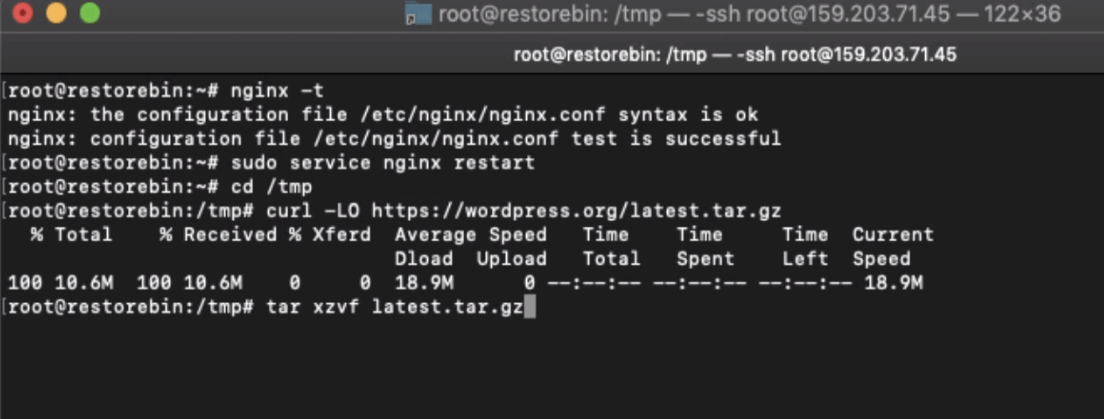
Now that our server has been configured. Let’s proceed with downloading WordPress into our server. It’s strongly recommended to download the latest version for security reasons.
cd /tmp
curl -LO https://wordpress.org/latest.tar.gz
Extract the WordPress compressed file:
tar xzvf latest.tar.gz
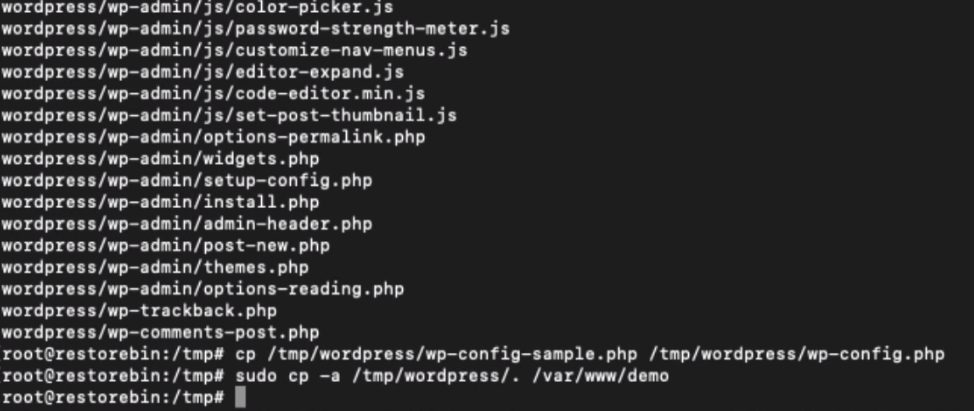
After extracting the WordPress in /tmp/ folder, let’s make the copy of wp-config-sample.php file to wp-config.php.
cp /tmp/wordpress/wp-config-sample.php /tmp/wordpress/wp-config.php
Now, we can copy the entire directory’s contents into our document root folder that we defined in the Nginx configuration file. Use the below command:
sudo cp -a /tmp/wordpress/. /var/www/demo
Now that we have moved the files to the correct directory, we need to assign the proper ownership www-data user and group. This is the user and group that Nginx runs and needs to be able to read and write WordPress files to serve the website and perform automatic updates.
sudo chown -R www-data:www-data /var/www/demo
We have now moved the WordPress to the document root folder and assigned correct ownership.
Next, we need to secure the installation by adding secret fundamental values and using the MySQL database details the wp-config.php file.
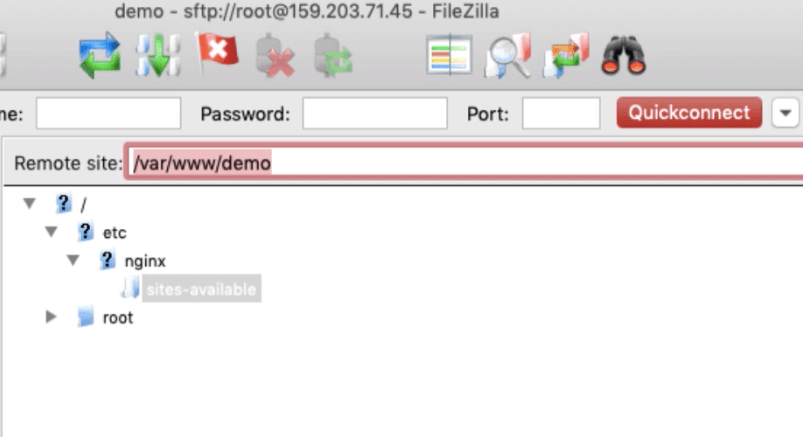
Open the WordPress configuration file in SFTP client FileZilla located in /var/www/demo/wp-config.php and follow the steps:
Generate the secret key using WordPress secret key generator in SSH:
curl -s https://api.wordpress.org/secret-key/1.1/salt/
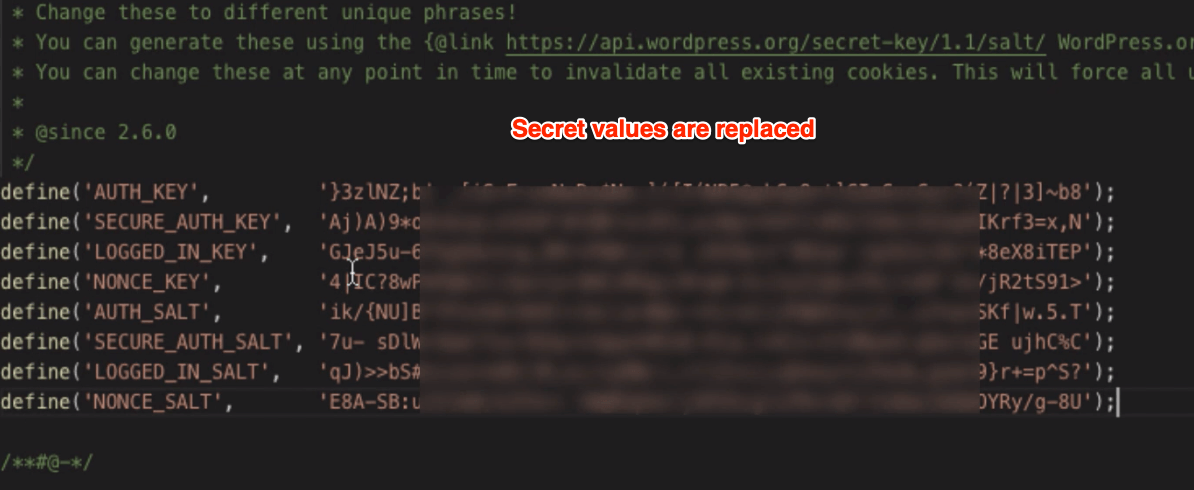
You will get the unique values that need to replace dummy values already in the wp-config.php file.
Next, we must modify the database value to reflect our MySQL database details.
. . .
define('DB_NAME', 'wpdatabase');
/** MySQL database username */
define('DB_USER', 'wpuser');
/** MySQL database password */
define('DB_PASSWORD', 'wppassword');
. . .
Finally, allow WordPress to write to the file system by defining the FS_METHOD in the wp-config.php file by adding the following snippet:
define('FS_METHOD', 'direct');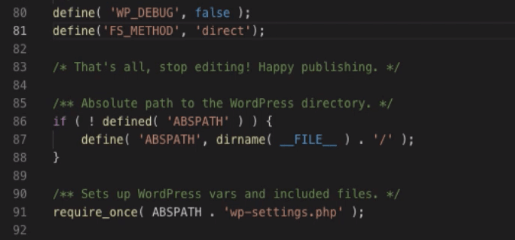
Please save the file, and upload it back to the SFTP server.
Finally, reboot the Ubuntu Server to commit all the changes made.
reboot
Install WordPress in Web Browser
We have completed the setup and configuration of Nginx, PHP, and MySQL to support WordPress installation.
To install WordPress, open the web browser and visit your domain name. For my installation, I will be visiting:
http://demo.restorebin.com
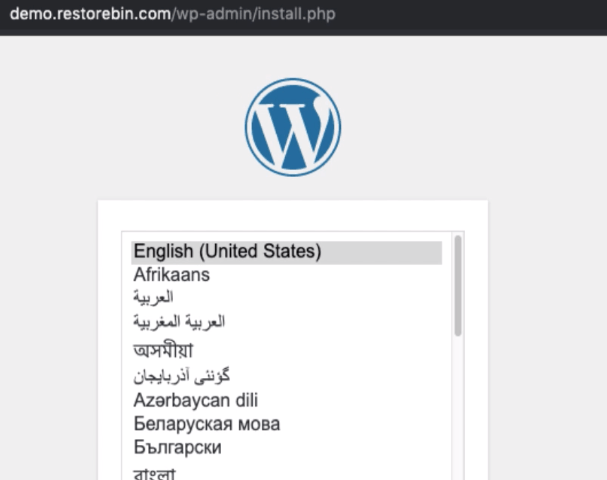
Select the preferred language from the list — I’ve selected English (United States).
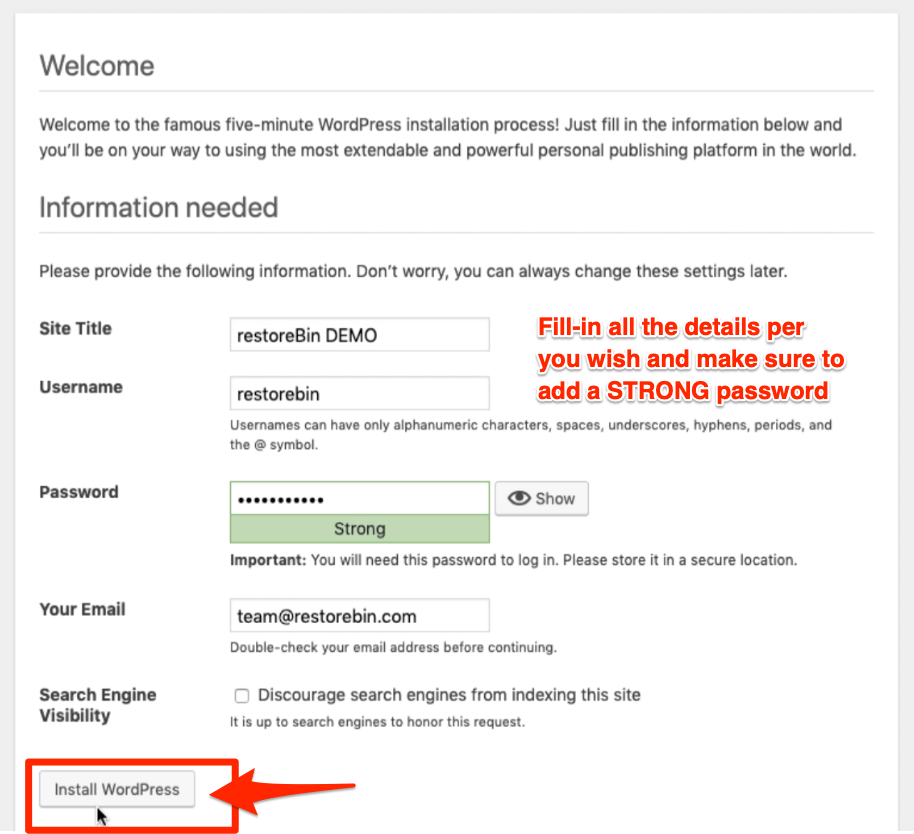
Continue next to the critical setup page, where you can enter the Site Title, Username, Password, and Email ID and select the Search Engine Visibility option.
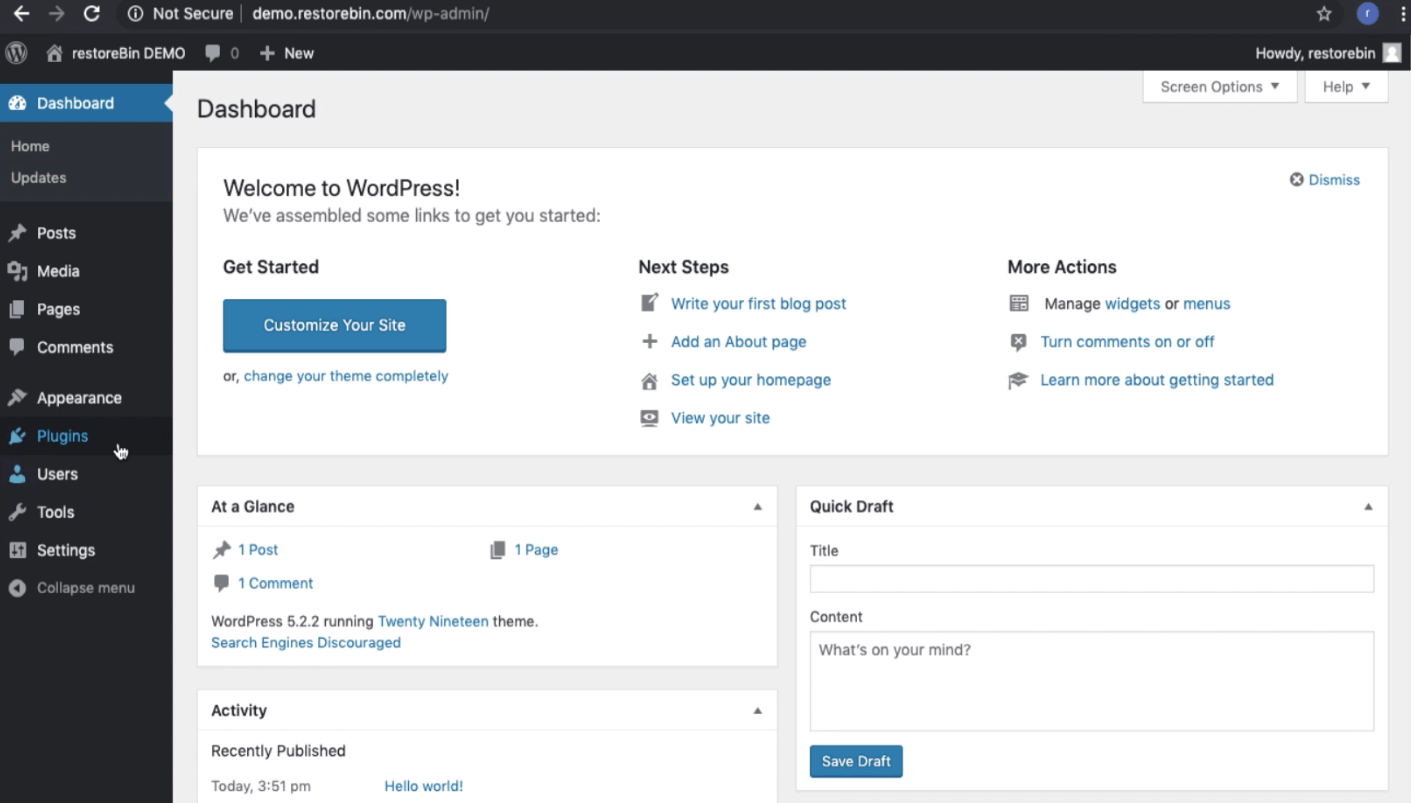
Finally, hit the Install WordPress button to complete the installation process successfully. Login to your fresh WordPress installation to see how it looks!
Video Demo to Install WordPress
Watch the complete demo on how to install WordPress with the LEMP stack on the Ubuntu server.
The video will cover all the steps discussed in this article, from creating the MySQL database to configuring the WordPress configuration file.
I hope you liked the video; please subscribe to the YouTube channel.
What’s Next in the #WordPressBlog Series?
In the following article, I will be sharing how to log in to WordPress for the first time and configure the preliminary settings in detail.