HTTP2 is the second-generation hypertext transfer protocol version with improved speed and secured connection. The primary goals are to reduce latency and add support for request prioritization.
In this article, we will learn how to quickly enable the HTTP2 protocol support in the Nginx web server and improve the SSL connection security.
Before we start, ensure you’ve already installed an SSL certificate and configured HTTP to HTTPS redirection. I’ve recently written an article about getting a free SSL certificate from LetsEncrypt, and this is an extended version of the previous article.
If you’re following, this is the seventh article and video demo in our #CloudServer series. We recently published the UFW firewall installation and setup.
Let’s dive into enabling HTTP/2 and advanced Nginx security setup —
How to Check Web Server Protocol?
You can quickly check the currently supporting protocol in Chrome Browser using Developer Options. Follow the below steps:
- Open Chrome Browser and Access your Website
- Open the Developer Options window by hitting the [F12] button on the keyboard, or you can also right-click for Inspect command
- Switch to Network Tab and Select Doc as type filter
- Reload the browser and check the Protocol* column in the field
You’ll be able to see the current web server protocol in Developer.
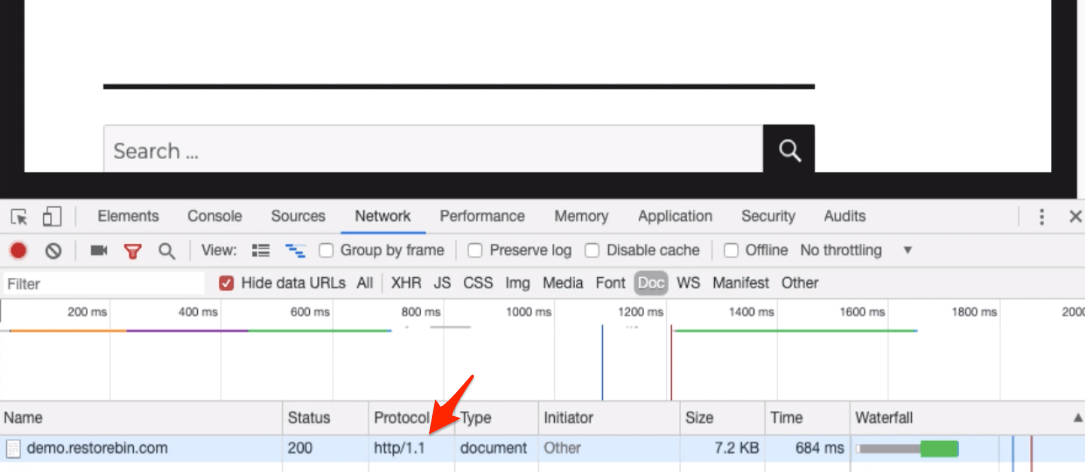
[* if you cannot see the Protocol field, right-click on the Name header and select the protocol to enable.]
How to Enable HTTP2 Protocol Support?
HTTP/2 only supports the secured HTTP, i.e., HTTPS connection. Hence, it’s sure that you will need an SSL certificate configured on your domain.
Since we have already configured the SSL using certbot, we will use the same configuration file.
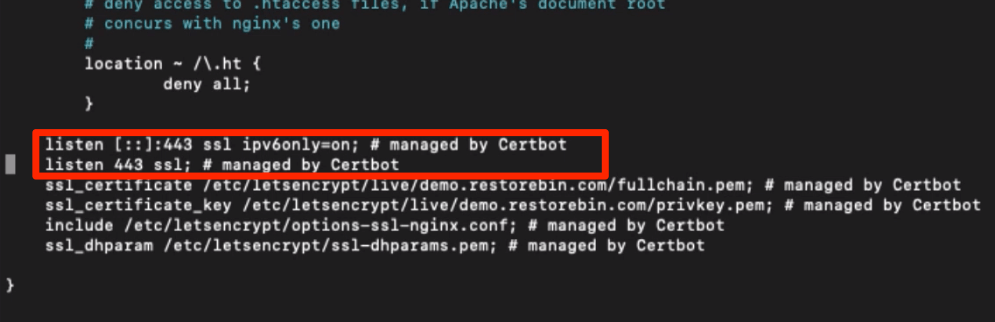
Open your Nginx configuration file and lookup for the additional rules added by Certbot. It should look like the below:
listen [::]:443 ssl ipv6only=on; # managed by Certbot
listen 443 ssl; # managed by Certbot
In my case, I’ve used the default configuration file and will open in the nano editor via SSH connection.
sudo nano /etc/nginx/sites-available/default
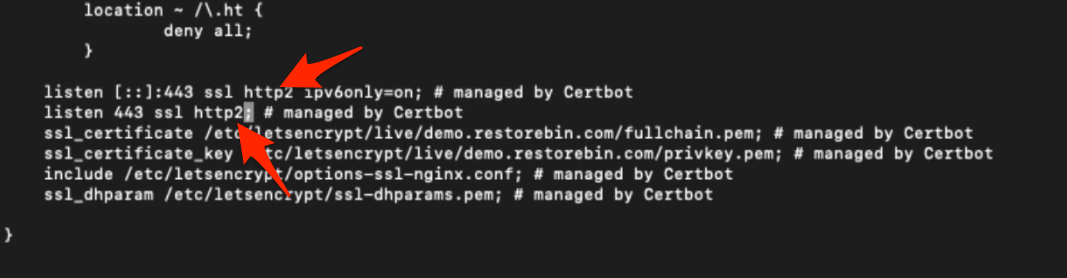
Now, modify the mentioned rules to add and support http2 connections like this.
listen [::]:443 ssl http2 ipv6only=on; # managed by Certbot
listen 443 ssl http2;  # managed by Certbot
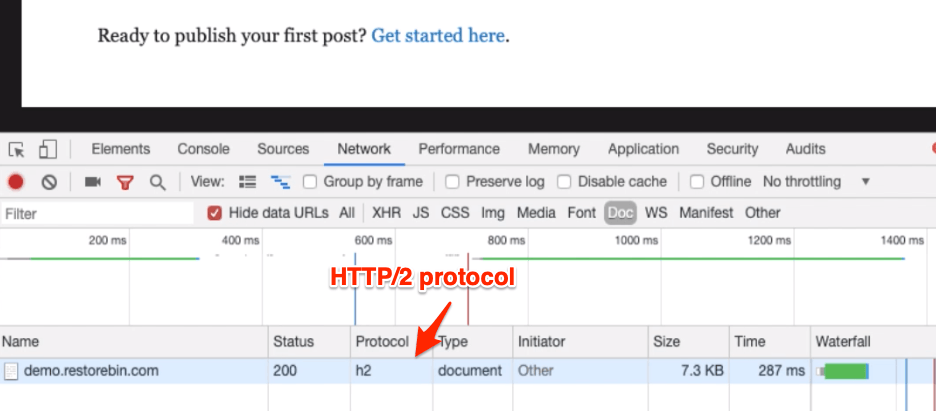
Once the changes are made, you can restart the Nginx server and again test the latest protocol of the webserver. I’m sure it will update it to h2, HTTP/2.
Head over to modify and improve the Nginx SSL certificate security.
Adding Trusted Certificate
In this same server configuration file, you can check for two additional rules added by Certbot. They will look like the below:
ssl_certificate /etc/letsencrypt/live/example.com/fullchain.pem;
ssl_certificate_key /etc/letsencrypt/live/example.com/privkey.pem;
Insert the following line under the ssl_certificate_key rule to add a trusted certificate.
ssl_trusted_certificate /etc/letsencrypt/live/example.com/chain.pem;In my case, I’ll be replacing the example.com with demo.restorebin.com, and my final ssl_trusted_certificate rule will be:
ssl_trusted_certificate /etc/letsencrypt/live/demo.restorebin.com/chain.pem;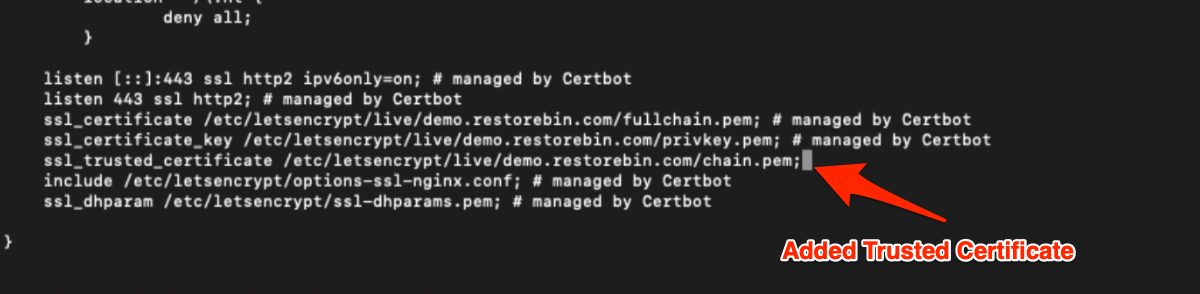
Close the nano editor once you insert this code. Your setup with default nginx configuration is completed.
Stronger SSL Certificate settings
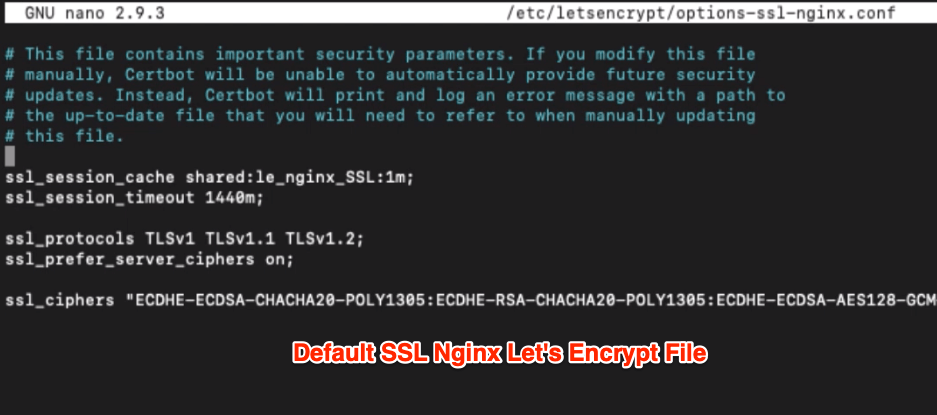
Now let’s edit the shared SSL settings at /etc/letsencrypt/options-ssl-nginx.conf. This configuration file is shared among all the virtual host nginx configuration files.
If you open the file in nano editor, it will look like this.
ssl_session_cache shared:le_nginx_SSL:1m;
ssl_session_timeout 1440m;
ssl_protocols TLSv1 TLSv1.1 TLSv1.2;
ssl_prefer_server_ciphers on;
ssl_ciphers "ECDHE-ECDSA-CHACHA20-POLY1305:ECDHE-RSA-CHACHA20-POLY1305:ECDHE-ECDSA-AES128-GCM-SHA256:ECDHE-RSA-AES128-GCM-SHA256:ECDHE-ECDSA-AES256-GCM-SHA384:ECDHE-RSA-AES256-GCM-SHA384:DHE-RSA-AES128-GCM-SHA256:DHE-RSA-AES256-GCM-SHA384:ECDHE-ECDSA-AES128-SHA256:ECDHE-RSA-AES128-SHA256:ECDHE-ECDSA-AES128-SHA:ECDHE-RSA-AES256-SHA384:ECDHE-RSA-AES128-SHA:ECDHE-ECDSA-AES256-SHA384:ECDHE-ECDSA-AES256-SHA:ECDHE-RSA-AES256-SHA:DHE-RSA-AES128-SHA256:DHE-RSA-AES128-SHA:DHE-RSA-AES256-SHA256:DHE-RSA-AES256-SHA:ECDHE-ECDSA-DES-CBC3-SHA:ECDHE-RSA-DES-CBC3-SHA:EDH-RSA-DES-CBC3-SHA:AES128-GCM-SHA256:AES256-GCM-SHA384:AES128-SHA256:AES256-SHA256:AES128-SHA:AES256-SHA:DES-CBC3-SHA:!DSS";
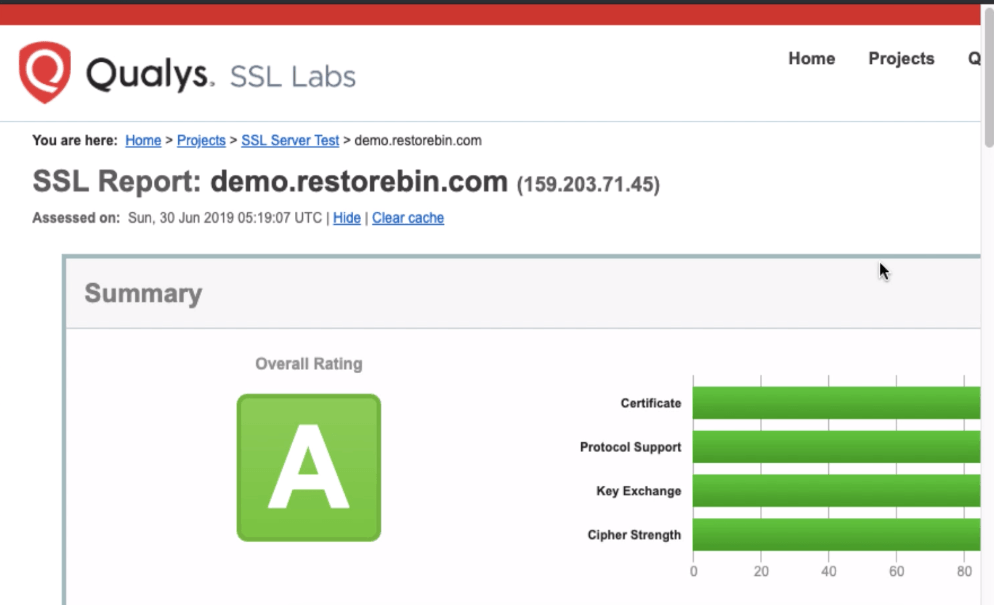
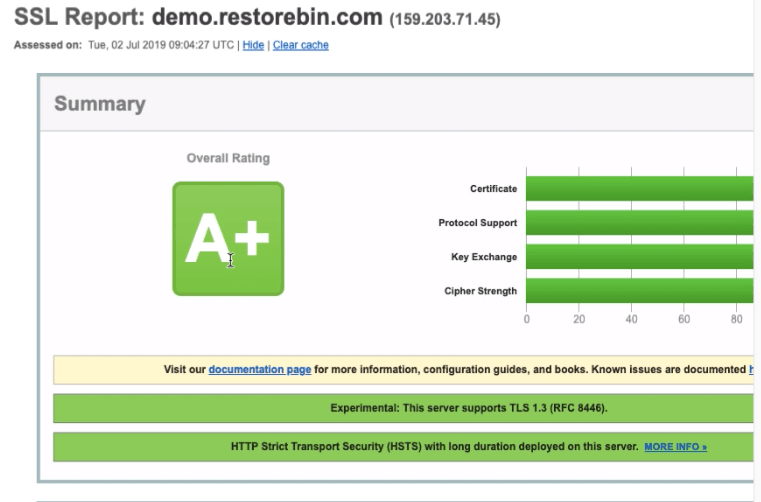
When we tested our Domain SSL certificate, we noticed some weak ciphers being flagged by SSLLabs. Hence, I missed scoring a perfect A+.
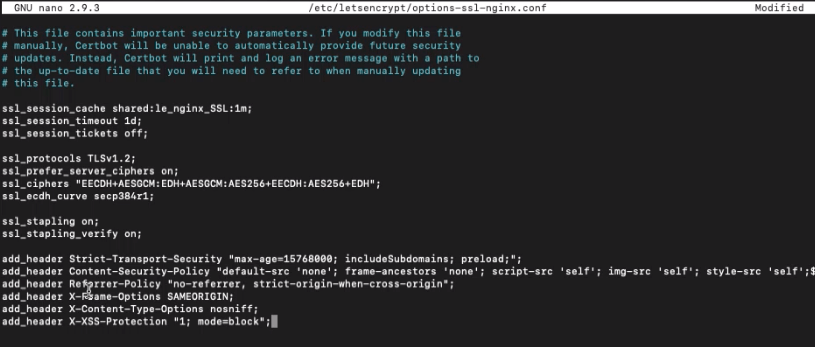
To replace the content file with the below to make those ciphers stronger:
ssl_session_cache shared:le_nginx_SSL:1m;
ssl_session_timeout 1d;
ssl_session_tickets off;
ssl_protocols TLSv1.2;
ssl_prefer_server_ciphers on;
ssl_ciphers "EECDH+AESGCM:EDH+AESGCM:AES256+EECDH:AES256+EDH";
ssl_ecdh_curve secp384r1;
ssl_stapling on;
ssl_stapling_verify on;
add_header Strict-Transport-Security "max-age=15768000; includeSubdomains; preload;";
add_header Content-Security-Policy "default-src 'none'; frame-ancestors 'none'; script-src 'self'; img-src 'self'; style-src 'self'; base-uri 'self'; form-action 'self';";
add_header Referrer-Policy "no-referrer, strict-origin-when-cross-origin";
add_header X-Frame-Options SAMEORIGIN;
add_header X-Content-Type-Options nosniff;
add_header X-XSS-Protection "1; mode=block";
After making the changes, close the nano editor and restart the Nginx server using the below command.
sudo service nginx restart
This will save and make all the changes live on the website server.
You can also test the domain certificate to find the latest security score. After making these changes, I hope it should be rated with an A+ score.
https://www.ssllabs.com/ssltest/analyze.html?d=demo.restorebin.com&latest
Video of HTTP2 Protocol and SSL security
Here is a quick video about enabling the HTTP2 protocol and tightening the SSL certificate security.
I hope you liked the video; please subscribe for more such interesting videos.
What’s next in the #CloudServer series?
Now that we have improved the web server’s security using a firewall and SSL connection. Let’s optimize the server to improve the speed and connection by using Nginx caching rules for browser cache and Gzip compression.
It will help save the static files in the client’s browser and serve the compressed file when requested.