Enable the cache is one of the best techniques to improve the site loading speed. But, most website owners and bloggers use the WordPress plugin. However, I prefer using the server-side caching technique, i.e., FastCGI Nginx Cache.
While using a Plugin for WordPress cache works well, it impacts the overall server performance as it needs heavy PHP processing power. Instead, we can harness the Nginx webserver to get better caching without executing the MySQL queries or utilizing the PHP processor.
In this article, we will learn how to set up and enable the FastCGI Nginx Cache on the Ubuntu Cloud server to improve WordPress site loading speed exponentially.
If you’re following us, this is the ninth article and video demo in our #CloudServer series. We previously posted about enabling browser cache and gzip compression in Nginx.
Let’s dive into creating the FastCGI Nginx Cache —
Create FastCGI-Cache configuration under /snippets/
We created the browser cache and gzipped compression in our previous article. We need to create a fastcgi-cache.conf file.
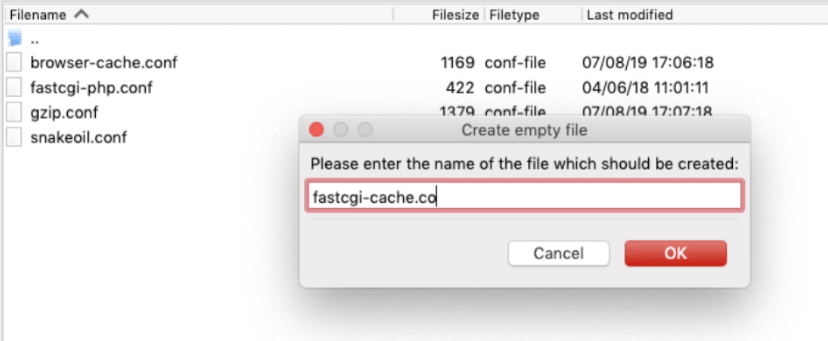
Create and open the file under /etc/nginx/snippets/ and add the following rules:
# The key to use when saving cache files, which will run through the MD5 hashing algorithm.
fastcgi_cache_key "$scheme$request_method$host$request_uri";
# If an error occurs when communicating with FastCGI server, return cached content.
# Useful for serving cached content if the PHP process dies or timeouts.
fastcgi_cache_use_stale error timeout invalid_header http_500;
# Allow caching of requests which contain the following headers.
fastcgi_ignore_headers Cache-Control Expires Set-Cookie;
# Show the cache status in server responses.
add_header X-Cache $upstream_cache_status;
# Don't skip by default
set $skip_cache 0;
# POST requests and urls with a query string should always go to PHP
if ($request_method = POST) {
set $skip_cache 1;
}
if ($query_string != "") {
set $skip_cache 1;
}
# Don't cache uris containing the following segments
if ($request_uri ~* "/wp-admin/|/deploy/|/xmlrpc.php|wp-.*.php|/feed/|index.php|sitemap(_index)?.xml|/store.*|/cart.*|/my-account.*|/checkout.*|/addons.*|/ideas.*|/wishlist.*") {
set $skip_cache 1;
}
# Don't use the cache for cookied logged in users or recent commenters
if ($http_cookie ~* "comment_author|wordpress_[a-f0-9]+|wp-postpass|wordpress_no_cache|wordpress_logged_in|woocommerce_cart_hash|woocommerce_items_in_cart") {
set $skip_cache 1;
}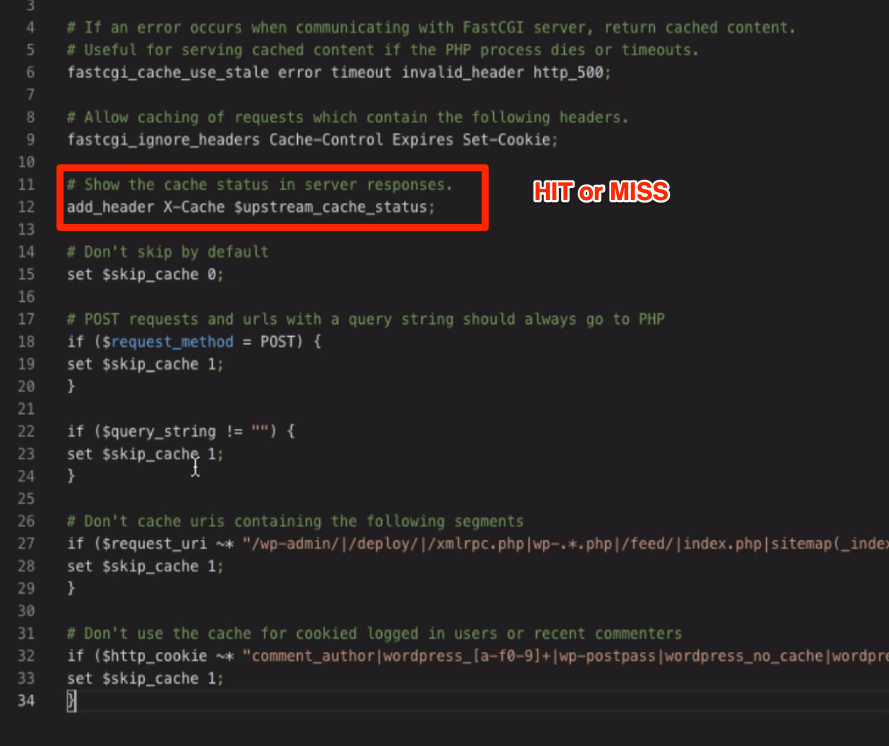
This will add the conditions when It should process the cache and display a header response with X-Cache to understand if our Nginx Cache is HIT or MISS.
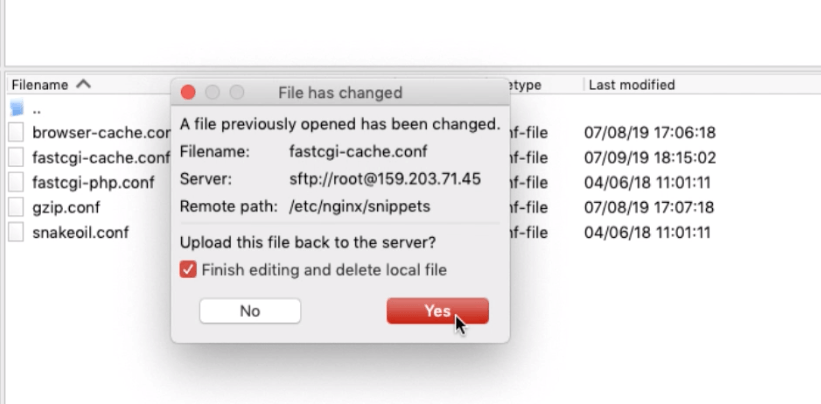
Close the fastcgi-cache.conf file and head over to default nginx configuration file.
Include FastCGI-Cache rules in Nginx
Open the default nginx configuration file located under /etc/nginx/sites-available. You can open configuration file in nano editor.
sudo nano /etc/nginx/sites-available/default
Now, add the following line to include the fastcgi-cache.conf within server { .. } block that we created in previous step:
# Fastcgi cache rules
include snippets/fastcgi-cache.conf;
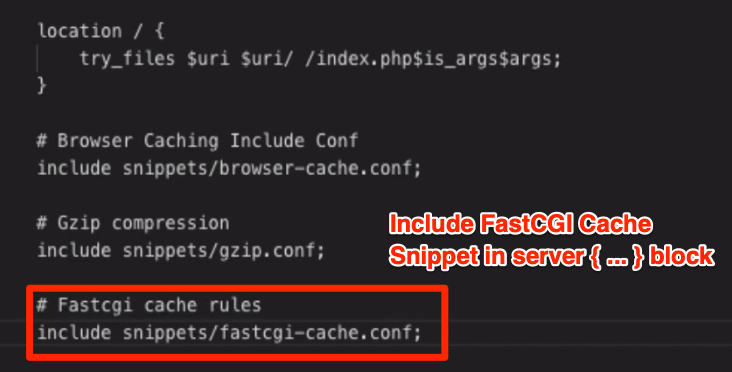
This will help include and follow the rules mentioned in the fastcgi-cache configuration file.
Adding the FastCGI Nginx Cache path
Open the default nginx configuration file and add the below line for setting up the nginx fastcgi-cache path:
# This config file uses nginx fastcgi-cache
fastcgi_cache_path /var/www/demo/cache levels=1:2 keys_zone=restorebindemo:100m inactive=60m;
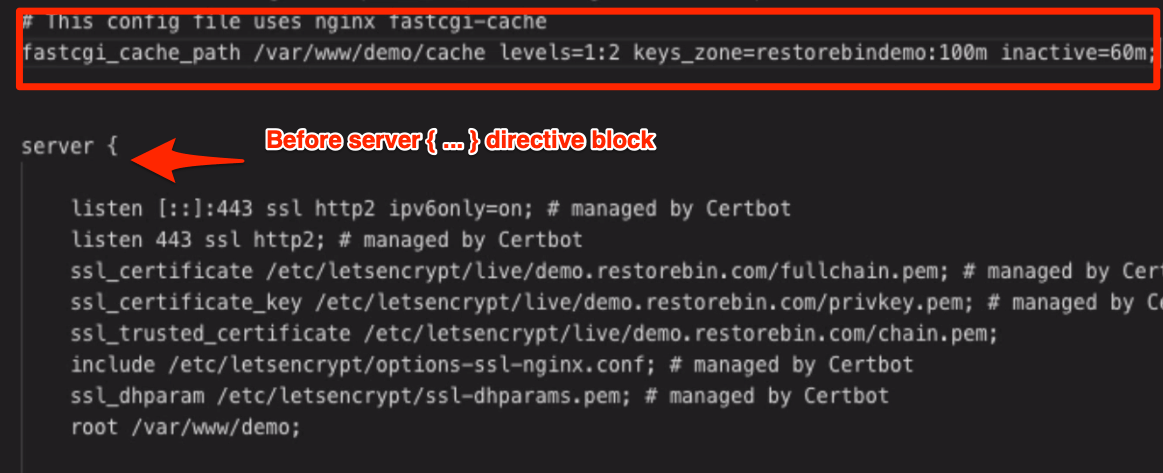
This will help Nginx read and write the cache files into the path and serve when requested.
Define FastCGI Cache Rules
Next, within the location ~ \.php$ { ... } directive add the following FastCGI-cache rules in the same default:
# Skip cache based on rules in snippets/fastcgi-cache.conf.
fastcgi_cache_bypass $skip_cache;
fastcgi_no_cache $skip_cache;
# Define memory zone for caching. Should match key_zone in fastcgi_cache_path above.
fastcgi_cache restorebindemo;
# Define caching time.
fastcgi_cache_valid 60m;
#increase timeouts
fastcgi_read_timeout 6000;
fastcgi_connect_timeout 6000;
fastcgi_send_timeout 6000;
proxy_read_timeout 6000;
proxy_connect_timeout 6000;
proxy_send_timeout 6000;
send_timeout 6000;
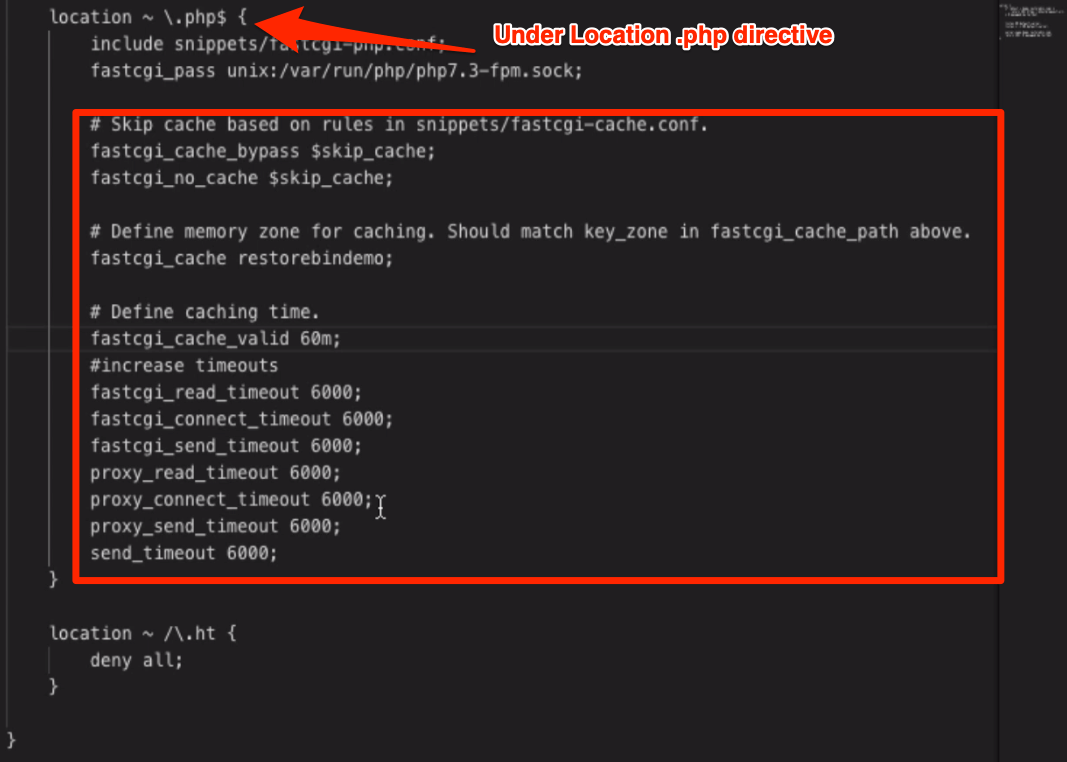
This will help nginx keep the cache valid for 60 minutes and set the timeout length. Now that we are done with adding and editing save and close the default configuration file.
Restart and Test FastCGI Nginx Cache
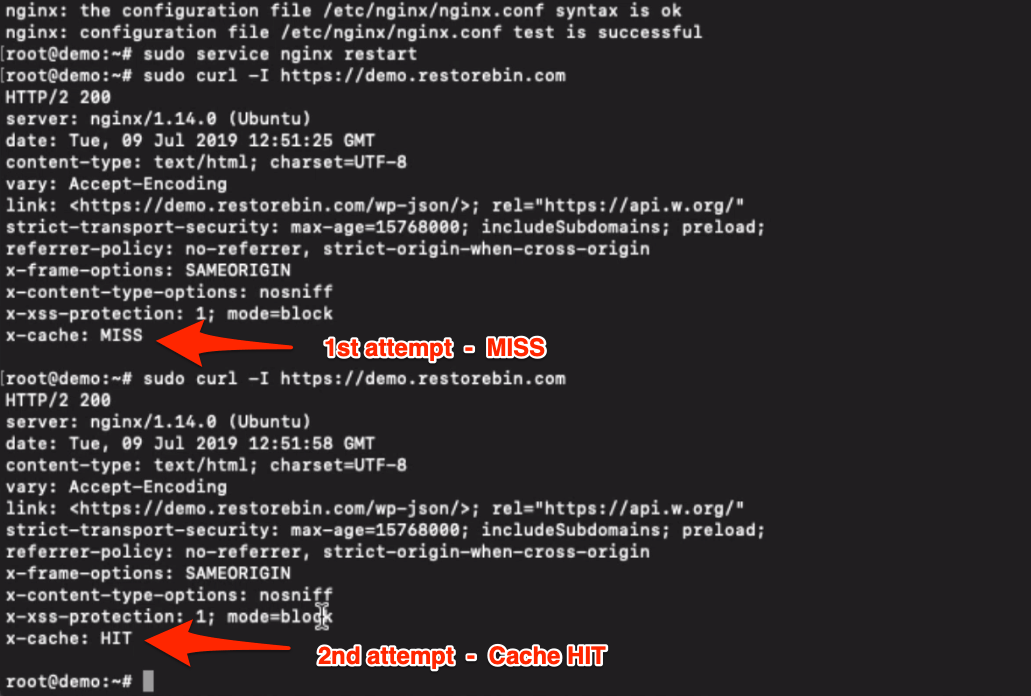
We have made all the changes needed for Nginx Cache to work. Test Nginx configuration file changes with the below command:
sudo nginx -t
And restart the webserver to commit the changes to the live server with the below command.
sudo service nginx restart
Now we can test the Nginx Cache in our SSH to read the response header using the below command. We need to execute the following command twice to verify whether the FastCGI cache parameter X-Cache is MISS or HIT.
sudo curl -I https://demo.restorebin.com
We can also check the Chrome browser under developer options to verify the Nginx Cache.
Clear Nginx Cache using WordPress Plugin
We have successfully configured the Nginx cache and defined the cache as valid for 60 mins. But, if we make any changes to the post or UI, that won’t reflect immediately. Hence, we need a cache buster for cache purging.
We can use a super easy WordPress plugin called Nginx Cache by Till Krüss. Follow the below steps:
- Login to WordPress Dashboard
- Navigate to Add New under the Plugins menu
- Search and Install the Nginx Cache plugin
- Activate the Plugin
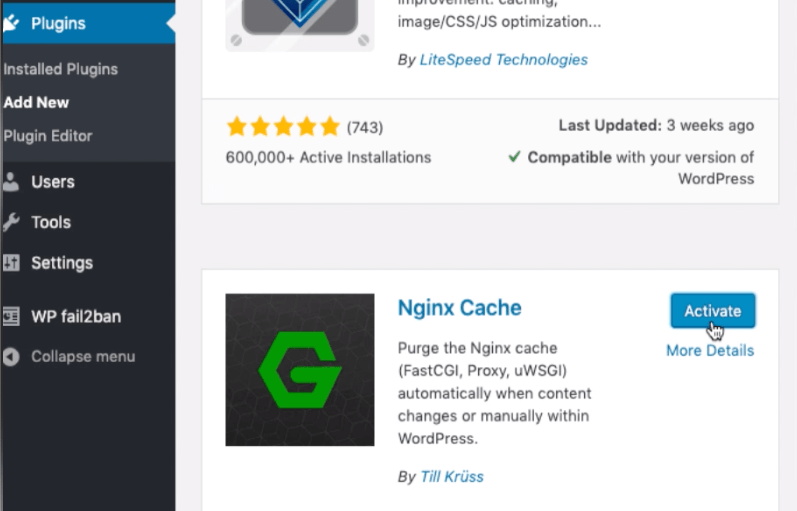
- On the Nginx Cache setting page, enter the fastcgi_cache_path that we’ve mentioned in Nginx Configuration file — /var/www/demo/cache
- Enable the checkbox to flush the cache when content changes Automatically
- That’s it!
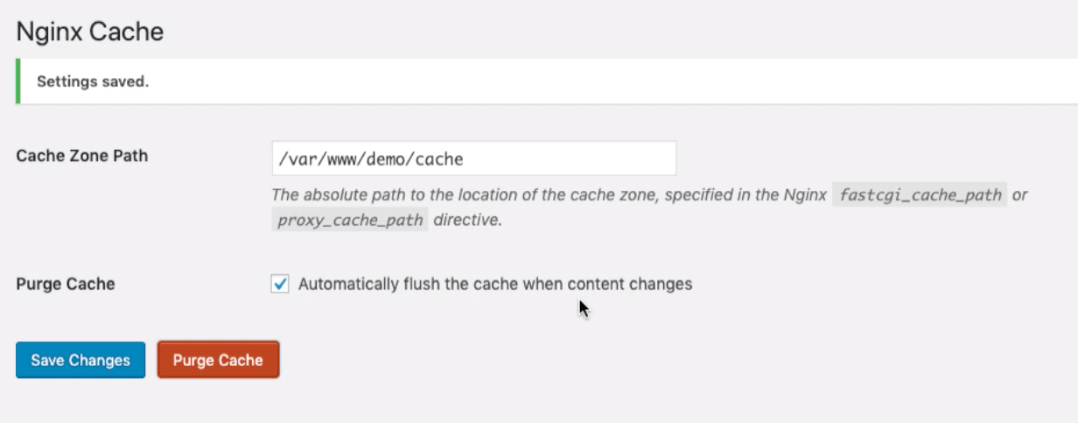
You can also find a new menu Nginx added on the WordPress Admin bar to Purge Cache at ease to clear the Nginx Cache manually.
Watch Nginx Cache Setup Guide
Watch the video tutorial on enabling the FastCGI Nginx Cache on the server-side. I’ve recorded precisely the step-by-step actions that are written in this article.
I hope you liked the video; please subscribe to our channel on YouTube.
What’s next in the #CloudServer series?
Now that we have learned how to enable the Nginx Cache at the server-side. Next, we will touch base upon enabling the Redis Cache for MySQL Database Caching. The redis object caching is used for WordPress MySQL caching.

add_header X-Cache-Status $upstream_cache_status;
Somehow this doesn’t work for me. I am not seeing any headers on curl. Is it possible that I don’t have **fastcgi** module? Because I don’t see any error while `nginx -t`
Hi Smit,
If the FastCGI module is enabled and configured per about instructions then you should be able to see the status in curl.
Did you miss any steps in the guide?
what to write in fastcgi_cache restorebindemo; in place of restorebindemo
# Define memory zone for caching. Should match key_zone in fastcgi_cache_path above.
fastcgi_cache restorebindemo;
You should enter the
key_zonename that you’ve set up in the Nginx configuration file.HI bro
I have setup the same setting on my server . Nginx Syntax is show okay with Waring , Please have look
“no fastcgi_cache_key for fastcgi_cache” in nginx.conf:68
Check line number 68 and set a fastcgi_cache_key. You can check my sample script for an idea.