We can use Gmail SMTP to manage our outgoing emails and receive them in our inbox when properly configured with the Postfix program.
Generally, we will need a robust mailing system to communicate emails from our domain server. This internal emailing system helps us receive notifications about the server’s health and forward the incoming emails sent to the domain address.
In the following article, we will install and configure the Postfix program to SEND-Only using an SMTP server. Google Mail or Gmail supports using their SMTP server settings on non-Google apps. We will be using the same in the below article to configure the postfix program.
Just in-case if you are following us, this is our fourth article and video demo under the #CloudServer Series. We previously published how to set up a powerful LEMP Stack on the Ubuntu cloud.
Let’s get started with configuring Postfix as SEND-Only SMTP on the Ubuntu cloud —
What is Postfix?
Postfix is a free and open-source mail transfer agent(MTA) that routes and delivers electronic mail. It is released under the IBM Public License 1.0, a free software license.
It means you can download and distribute the software program freely. It’s one of the oldest and most used MTA software and an alternative to the Sendmail program.
Postfix runs basically on the Unix system, including our Ubuntu Cloud server. I use Postfix and recommend the same due to its simple configuration and setup.
Changing the Hostname on Ubuntu Server
Before we configure Postfix MTA, let’s adjust our hostname to reflect the correct domain name in our outgoing internal email.
Setting up a hostname is crucial if you’re using a custom domain for emailing. The hostname helps in proper mailing address.
One of the most accessible and reliable solutions I recommend is using G Suite to have a business email address, for example: [email protected]. You can also get a 20% discount on signing up using this Google Workspace coupon code.
About Hostname, you can check your current hostname using the below command line in SSH:
hostname -f
We can also use the hostname command to change the Ubuntu Server hostname.
hostname example.comI will be changing the hostname to demo.restorebin.com using below command.
hostname demo.restorebin.com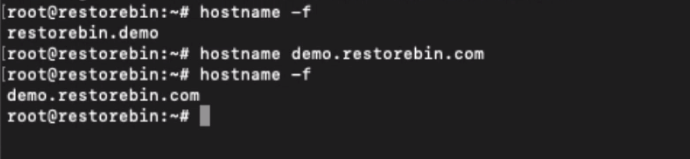
But, this hostname will be valid only until restart; however, to make this change permanent, edit the hostname and hosts file via SSH.
sudo nano /etc/hostname
Modify the hostname file to reflect below
demo.restorebin.comClose the nano editor using Ctrl+c on the keyboard and save the changes. Next, modify the hosts files as well using nano editor:
sudo nano /etc/hosts
Modify line with IP Address 127.0.1.1 to reflect below:
127.0.1.1 demo.restorebin.com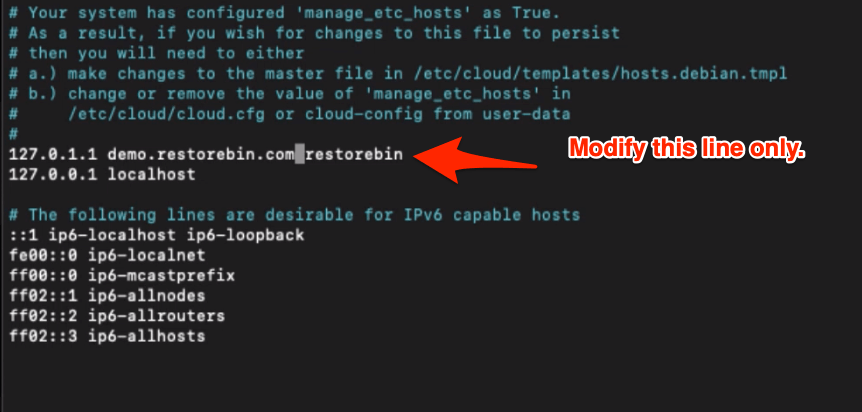
Close the nano editor, and reboot the Ubuntu server using the below command:
reboot
Note: make sure you’re using your domain name and address; the demo.restorebin.com is just for example.
That’s it! You have successfully changed the hostname of the cloud server.
Installing Postfix on Ubuntu Cloud
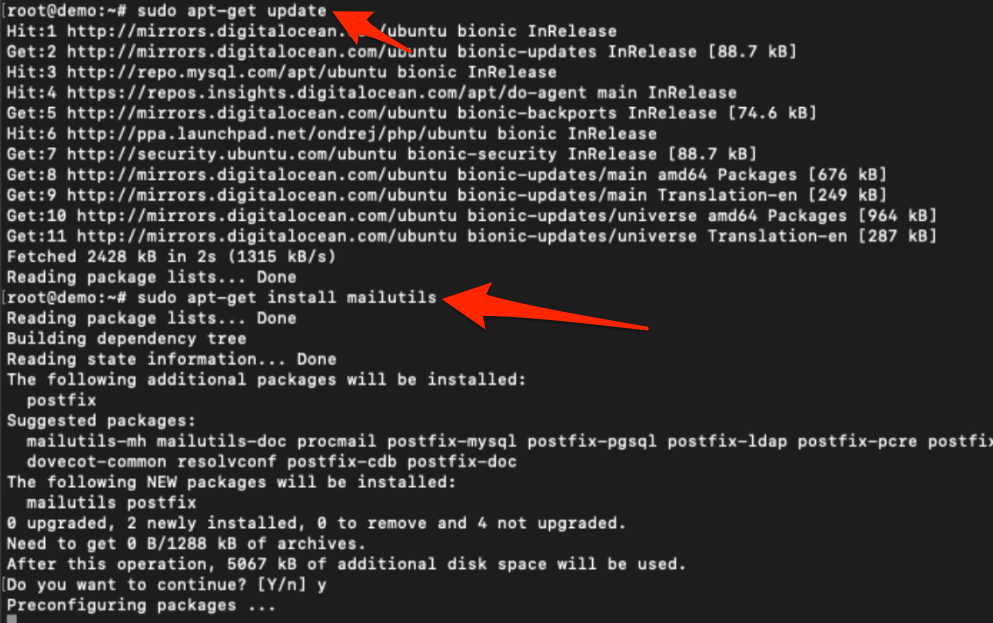
Get started with the install and configure Postfix by updating the apt repository first using the below command:
sudo apt-get update
Run the below command to install Postfix and other mail utilities on the Ubuntu cloud.
sudo apt-get install mailutils
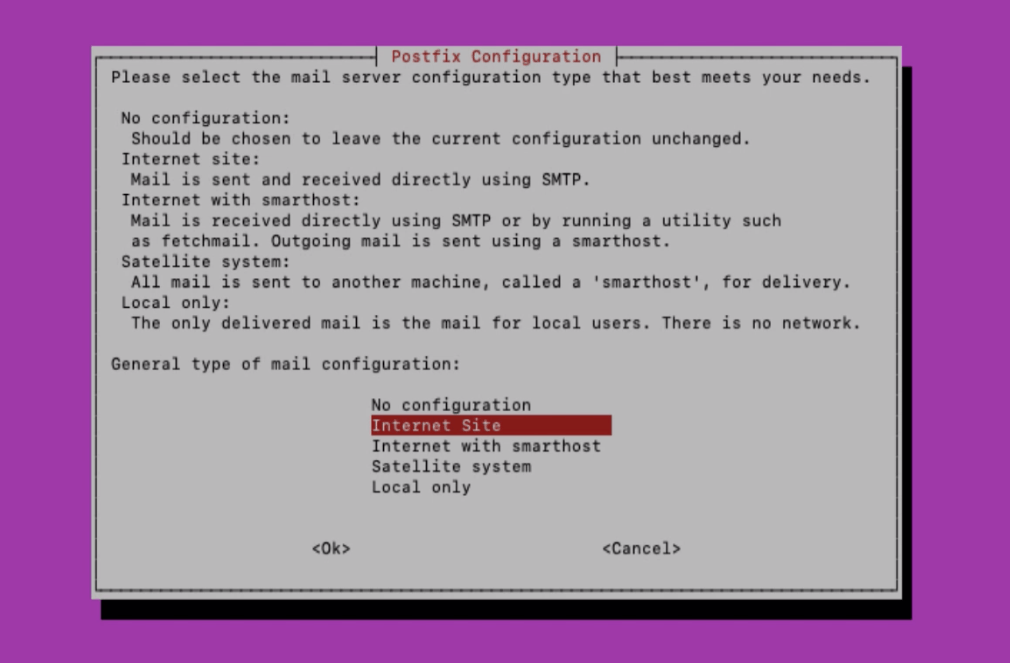
You will be prompted to provide additional information and configure Postfix during installation. First, it will ask to select the best suitable server settings. Since we are going to use SMTP, select the Internet option from the list and hit the [Enter] button.
Next, you will be asked to set the fully qualified domain name FQDN. This is nothing but the domain extension that you want to receive the email from.
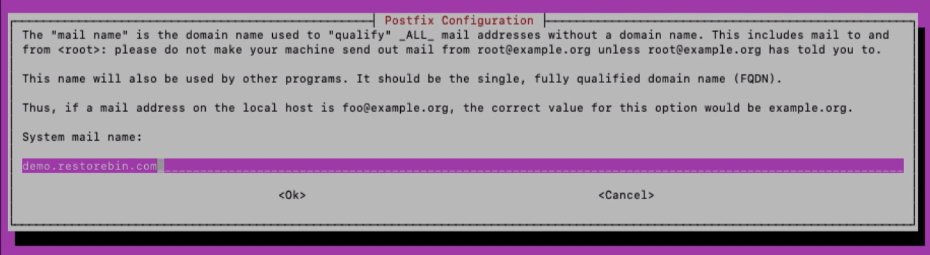
We should generally set this same as hostname. Hence, fill in the same and hit the [Enter] button. In my case, the hostname is:
demo.restorebin.comYou can always reconfigure the Postfix using the below dpkg command:
dpkg-reconfigure postfix
Configure Postfix with Gmail SMTP
Now that your Postfix is installed, head over to configure Postfix to use Gmail for SMTP relay.
Open the Postfix configuration file main.cf using located in /etc/postfix/ directory.
sudo nano /etc/postfix/main.cf
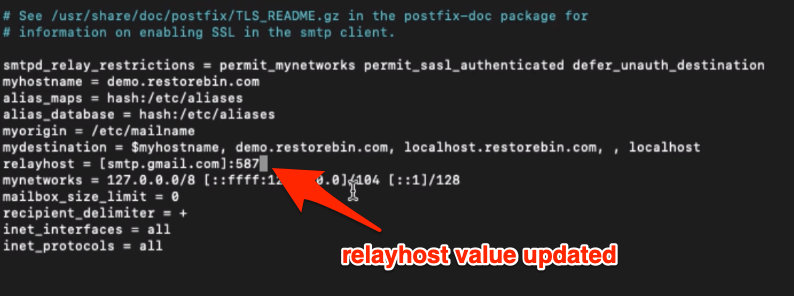
Please scroll to the bottom to find the relayhost = option and set it to the Gmail SMTP server
relayhost = [smtp.gmail.com]:587
We will be using the encrypted TLS connection for all the outgoing emails; hence the port number is set to 587
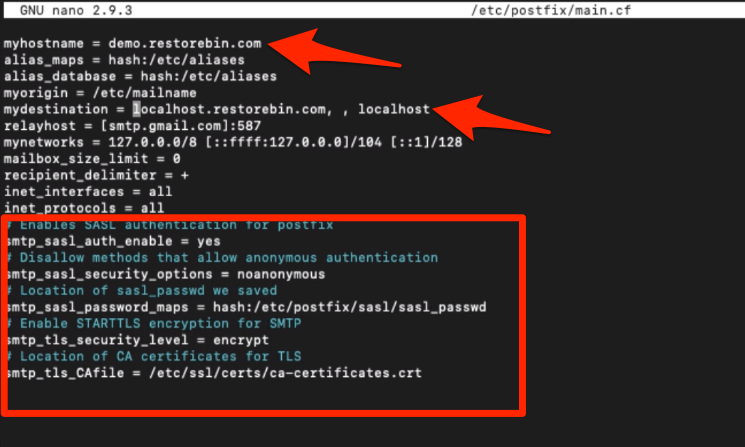
Next, we will be adding a few lines at the end of all other existing code to enable secure authentication and read the hashed password for SMTP.
# Enables SASL authentication for postfix
smtp_sasl_auth_enable = yes
# Disallow methods that allow anonymous authentication
smtp_sasl_security_options = noanonymous
# Location of sasl_passwd we saved
smtp_sasl_password_maps = hash:/etc/postfix/sasl/sasl_passwd
# Enable STARTTLS encryption for SMTP
smtp_tls_security_level = encrypt
# Location of CA certificates for TLS
smtp_tls_CAfile = /etc/ssl/certs/ca-certificates.crt
Also, ensure that the myhostname = value is set to the hostname we defined earlier. In my case, I’ll be setting it to:
myhostname = demo.restorebin.comThe last thing you need to change in Postfix’s main configuration files is adjusting the mydestination value. Edit the value to reflect something similar to this.
mydestination = localhost.yourhostname.com, , localhostYou can now close the editor and save the changes.
Next, we will add the password credentials into sasl_password for authenticating the encrypted SMTP connection.
First, create a new file using nano editor:
sudo nano /etc/postfix/sasl/sasl_passwd
Add the Gmail password in below format in sasl_passwd file:
[smtp.gmail.com]:587 your-email-address@gmail.com:password
Replace with your Gmail address and password in the above code before pasting into sasl_passwd file.

Convert the sasl_passwd file into a database file, and delete the original file from the server. We can use the postmap command for converting.
sudo postmap /etc/postfix/sasl/sasl_passwd
This will create a sasl_passwd.db file in the same location.
Change the security and ownership of the password file to restrict root user access and read-write only.
chown root:root /etc/postfix/sasl/sasl_passwd.db
chmod 600 /etc/postfix/sasl/sasl_passwd.db

Finally, restart the postfix using the below command to make the changes permanent.
sudo service postfix restart
At last, change the setting in Google Account to allow less secured non-Google apps to use authentication to send emails via SMTP on your behalf.

Sending a Test Email
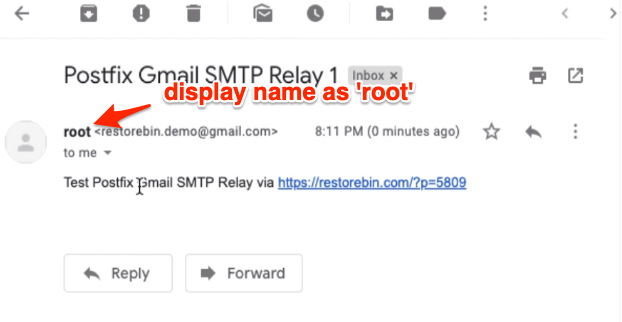
Once you’ve restarted the Postfix post-configuration, try sending a test email using the below command.
echo "Test Postfix Gmail SMTP Relay via https://wpaq.com/?p=5809" | mail -s "Postfix Gmail SMTP Relay 1" your-email-address@gmail.com
Do not forget to replace the Email ID with your mailing address.
Changing the Full Display Name
When you received your test email, you might have noticed that the display name is root.
To change the display name, you need to define it using the chfn script. CHFN is nothing but an acronym for Change Full Name.
Let’s see what names the users have on our server using the below command.
getent passwd $USER | cut -d ':' -f 5 | cut -d ',' -f 1
This command will output all the Users’ full names. And since we have only a root user, we will watch the only following output.
root
Using the below command, you can change any Unix user’s display name or full name.
sudo chfn -f "FirstName LastName" username
For example, I will be changing the full name of root user to ‘restoreBin Demo,’ hence my command line will be:
sudo chfn -f "restoreBin Demo" root
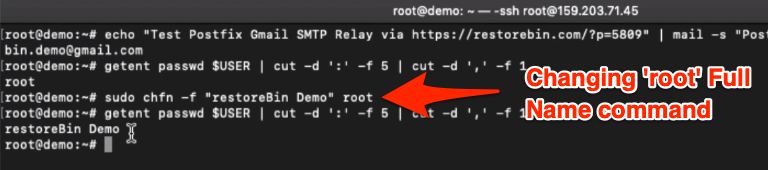
That’s it; the user’s Full Name or Display Name has changed successfully.
Resend Test Mail
You’ve made the changes to Hostname and Display Name of the root Ubuntu user. Try sending an email again to check if the changes are applied using the same command.
echo "Test Postfix Gmail SMTP Relay post modification via https://wpaq.com/?p=5809" | mail -s "Postfix Gmail SMTP Relay 2" your-email-address@gmail.com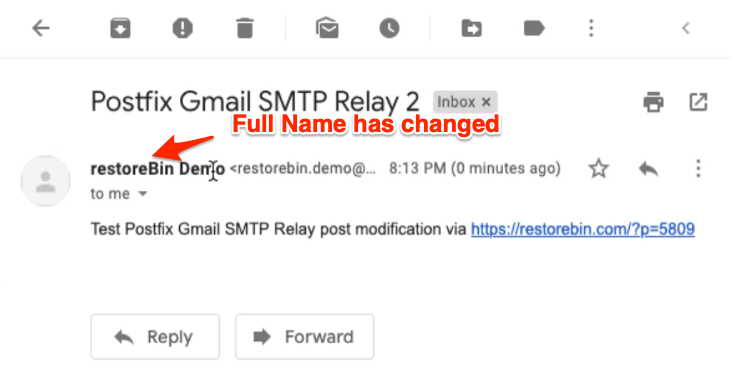
This will also help to validate whether the server is intact and not broken after changes.
Video on Postfix Configuration
Watch and learn to configure Postfix on Ubuntu Cloud Server with Gmail SMTP Server for internal emails.
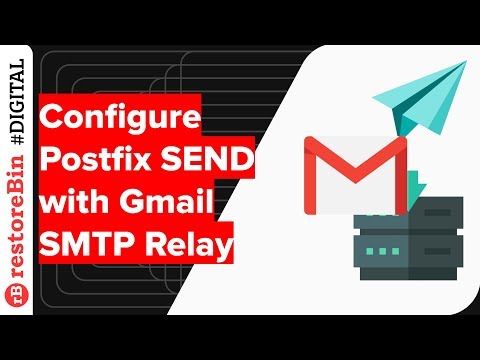
I hope you liked the video; please subscribe to our channel.
What’s next in the #CloudServer series?
This article teaches about the emailing system and configuring Postfix on Cloud Server. In the following article, I will be sharing how to generate a free SSL certificate using Let’s Encrypt.
Let’s Encrypt is a free Open Source certificate generator powered by the community, which helps establish the secured connection between host and server. You might also want to know that HTTPS secured connection is a ranking factor in search engine optimization.

Thanks for the video. As per your article I have configured a postfix server and able to send mails. I am using gsuite as mail server. Please suggest me two things:
1. I want to send the messages to a list of recipients. Till now I was using phpmailer but it is very slow so I want to use postfix for sending messages. How I can do that?
2. Is it possible to use the phpmailer with postfix. I searched for that but could not find.
Thank You
Hi Ravindra, thanks for your comment.
I’m really sure about the
phpmailer(still learning though).I feel that you might be aware of this. Be cautious about is Gmail SMTP Relay sending limit. If you’re overusing the limit or sending bulk emails may lead to suspension and also categorized under spam.
Hi,
Any prerequisites?
Just a fresh LEMP or LAMP stack is enough.
Simple step but success to do this on ubuntu server 18.04 with apache2 web server! thx for this page
Cheers! Gunawan.
Thanks for the info! I have followed the steps except I swapped Gmail SMTP for Mailgun SMTP. For some reason I keep getting a connection timeout error in my /var/log/mail.log when I try and send my test emails. It works great on my other server, but not on this one for some reason. Only thing that is different is the working server is on Ubuntu and the non working server is Debian. Any ideas? Error: events postfix/smtp[3992]: connect to smtp.mailgun.org[44.231.238.210]:587: Connection timed out
Hi Gage, I’ve no experience working with Mailgun. As far as Ubuntu vs. Debian is concerned, that shouldn’t be a problem both are Linux based and the mentioned steps should be working with both. By any chance have you been using any other MTA prior to Postfix?
Also, suggest checking with Mailgun support if they’ve any threshold for connection time out.
Very detailed. best postfix tutorial. thankyou!
Glad that helped! 🙂
Thank you very much for your very helpful information about configuring Postfix to use Gmail as a mail server. Every thing went perfect.
Thank you, Zeezo! 🙂
Hi ! Thanks for your guide. I am having the following error and I am hoping you can assist me please:
postfix/error[32525]: 639621026B0: to=, relay=none, delay=0.03, delays=0.02/0.01/0/0.01, dsn=5.0.0, status=bounced ([smtp.gmail.com]:587)
Not sure where I am going wrong. I have completed all the steps.
The status is showing as ‘Bounced’. Looks like you’ve entered an incorrect recipient email address. Please retry sending with ID.
You say:
“Convert the sasl_passwd file into a database file, and delete the original file from the server. We can use the postmap command for converting.”
then you say:
“Change the security and ownership of the password file to restrict root user access and read-write only.
chown root:root /etc/postfix/sasl/sasl_passwd
chmod 600 /etc/postfix/sasl/sasl_passwd
”
Which is not valid, as we already deleted the file?
I meant to restrict the hashed DB file to root access. The file that we have entered the password should be deleted. However, I’ve adjusted the code a bit to make it clear. Thank you for pointing this out.
im new to this but is it possible to send messages to other gmail users without knowing their password
Unfortunately, no! That will be considered as phishing and result in losing the Gmail account. However, you can configure your own Google account with SMTP and send emails using postfix.
After following the set up instructions I tried the command line to send an email. I just copied your example (change the email address). It failed with this output:
-bash: mail: command not found
What’s wrong?
I’m running Ubuntu server 16.04
Thanks for the easy to follow article and the steps and explanation were very simple. In my case the postfix package had to be installed manually, since the mailutils didn’t do that. Also used the app password feature of gmail account instead of the regular password to setup the password on the Ubuntu server.
As of May 30,2022, this does not work anymore, as Google does not allow the “less secure” option anymore!!
You can create App passwords for third-party programs like postfix, it’s more secure. You will find the option under Google Account > Security tab.
This was very informative and worked great for me. I have one question however, is it possible to Configure a Postfix Server to Recieve Email through Gmail. If there is how can I?
Most of the cloud servers do not allow receiving the emails (they block the mail port), and postfix is a Send-only mailing server hence, receiving is not possible. Few online guides can help in receiving emails, but it purely depends on your web server where it allows the emailing port (service)
From May 2022 the option “less secure app” is no more available, it’s not possible to use smtp relat with Postfix ang GMail.
You can create App passwords for third-party programs like postfix; it’s more secure. You will find the option under Google Account > Security tab.
Thank you very much!
Thanks for the instruction! It really helped me a lot.
btw, I keep getting “Delivery Status Notification (Filure)” mail from Google. And it’s saying root@[myhostname] doesn’t exist. Do I miss something while following your instruction?
By any chance, SMTP is used for sending emails to your server? I think some other program or application is trying to send emails to the server’s root address.
Hi,
in main.cf you inserted a line with CA Certificate. Where did you get the certificate from? Path does not exist on my system. Thanks.
You need to install the Let’s Encrypt for installing the CA Certificate.